Following up on my DIY slave flash project, I thought I’d get something more powerful than that tiny Xenon bulb. I bought the cheapest flash on DX.com – the CY-20. It has a considerably large bulb and as a plus, it has what looks like a tiny window on the front for automatic output control. The main reason for getting this was the 2.5mm jack on the back of the flash that allows it to be externally triggered.

Opening it was easy. Remove the 4 screws that secure the hotshoe mount and go round the casing to release the retaining clips. Surprise surprise, take a look at the sensing window.

For less than $15, I should have expected that, or I should have done my homework first. First things first: remember to discharge the capacitor! Anyway, I unscrewed the board and took a look at its construction.
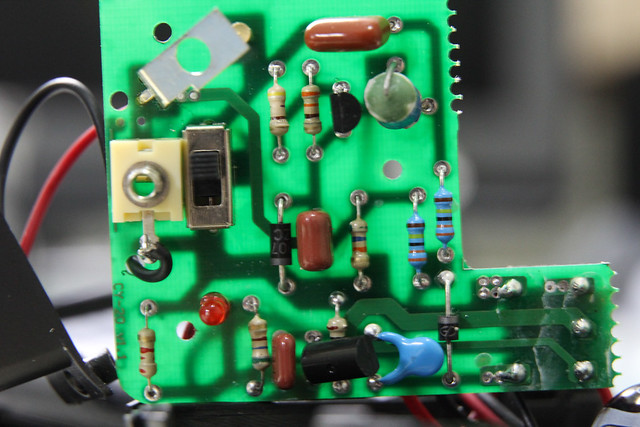
The top half of the component side contains the Test button contacts, the trigger thyristor in a TO-92 package, and the high-voltage coil wrapped in wax. The lower part consists of the Ready LED, the TO-92L transistor that drives the transformer and the transformer itself (mounted on the back side).

The first thing you might notice is how they didn’t use V-grooves, but instead chose to drill a series of holes. The remaining edges were obviously routed. The board was labelled “CY-20 v1.1”.
I tried tracing the PCB but I really suck at it. In the end, I got a circuit that was quite close to this one reverse-engineered by Stepan Novotill, but I got the direction of the diode wrong and the transformer windings didn’t make sense.
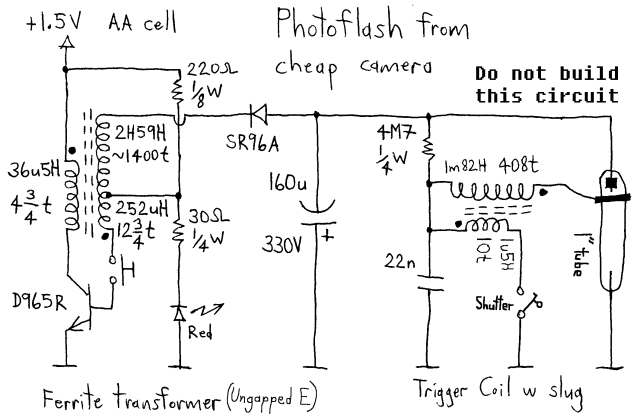
The circuit of the CY-20 is similar, but obviously not exactly as you see here. The main difference is that the CY-20 uses a CR02A thyristor to trigger the high-voltage transformer, so that the external triggering circuit is not exposed to the high voltage. Like most cheap flashes, a low part count is achieved by using a smaller winding on the main transformer to drive the primary side. This gives it that characteristic charging-up whine that you hear as the capacitor fills up, due to the frequency being in the human audible range. Also note that there is no automatic cut-off once the capacitor is full. The more expensive flashes use a microcontroller to control the step-up circuit, allowing them to achieve quicker and more efficient charging, as well as shifting the frequency out of the audible range.
The capacitor used is a 250μF 330WV, and the step-up transformer is driven by a A1160 PNP transistor by 风光欣电子 (FGXDZ). Nothing much to see here.
Finally, here’s a shot of it hooked up to my DIY slave flash trigger on a breadboard:

It is way brighter than the disposable camera, and it has an adjustable head that can face forwards or all the way upwards (as seen here). Since it has a hotshoe mount, you can mount it conveniently on a stand too (sold separately).
Should You Get It?
I’d imagine you can buy a whole lot of these and trigger them at the same time to light a really large area very cheaply. However, it’s not very useful as you can’t control the amount of light coming out of these. I had hoped that the auto-sensing capability would provide some control over this, but obviously it’s not present in this model.
The recycle time is comparatively long as it is determined by the transformer feedback. You can trigger the flash before the capacitor fully charges, but then the amount of light output would be unpredictable.
I would say the CY-20 is well suited for lighting a very large area, or for use in bright daylight. You can also use it in an art installation or something. It is cheap and can be externally-triggered via a 2.5mm jack on the back. However, the lack of output power control would be a deal breaker for some.

Hello sir , is there any way to attach a variable output controller on this flash , i have this flash and want to mod it to give variable output.
Hi Abhishek, you can try to modify the charging circuit with a variable resistor such that it only charges the capacitor partially, but this method is rather inefficient. Flash units with adjustable output typically use an IGBT to cut off power to the flash tube but I think that involves quite a bit of work. To save myself the trouble I just bought another flash unit with adjustable power.
What if I put the resistor between the lamp and the circuit? Wouldn’t this work?
Hi Marco, that wouldn’t work because Xenon flash tubes operate differently. Flash units with intensity controls usually use IGBTs for this purpose.