Last week as I was making my rounds at the supermarket, I came across this digital bathroom scale on sale. With some membership card, the discount was almost 50% and at S$16, I thought that was a pretty good deal. It is “wireless” in that it has a separate display unit that could be detached from the scale itself. This bathroom scale had “HACK ME” written all over it.
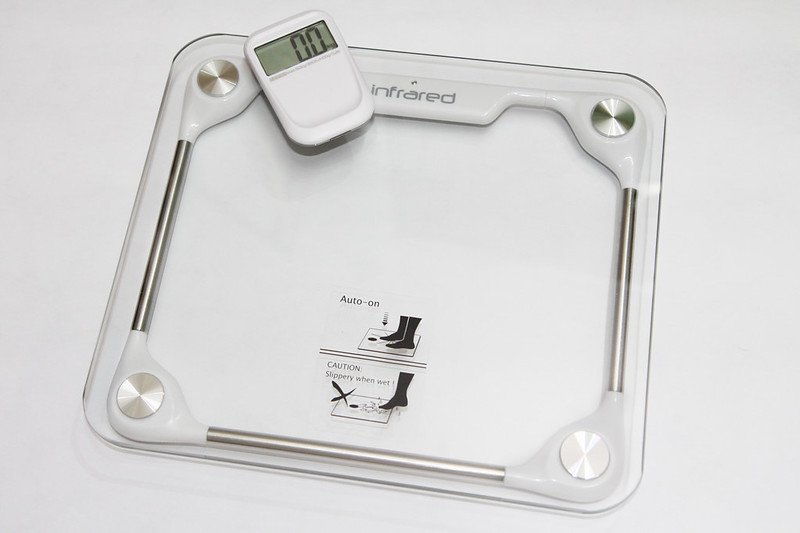
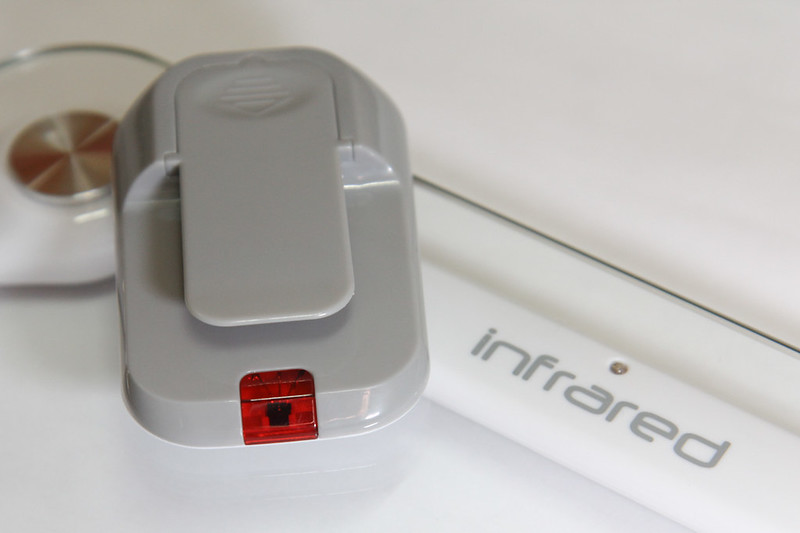
It turns out that this bathroom scale is the EB9121 made by a Chinese (OEM?) company called Zhongshan Camry Electronic Co. Ltd (or simply Camry). The box specifically mentions that it uses infrared for transmission, and given that I had some experience looking at IR signals, I thought it would be rather straightforward.
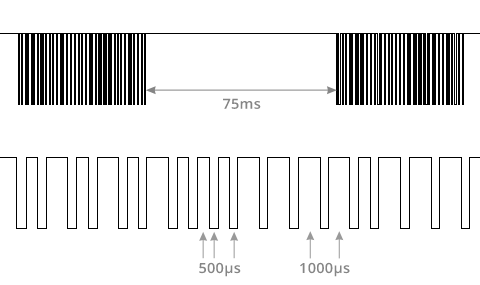
I hooked up an 38kHz IR receiver to the logic analyzer and placed it near the scale while I was standing on it. It looks like the scale was using pulse distance coding to encode the data, and each burst was separated by a ~75ms space. The data is represented by 500µs, followed by either 500µs or 1000µs, making the total duration of each bit either 1ms or 1.5ms.
I would probably die if I had to manually mark the 1’s and 0’s on the waveform for analysis. Since I already had some code for a toy Saleae analyzer plugin lying around, I hacked it up to mark 1’s and 0’s on the waveform depending on the pulse distance. Saleae analyzer plugins can also put bubbles above a group of individual bits in order to present the decoded data for easy interpretation. Having an analyzer plugin definitely helps with reverse-engineering the protocol:
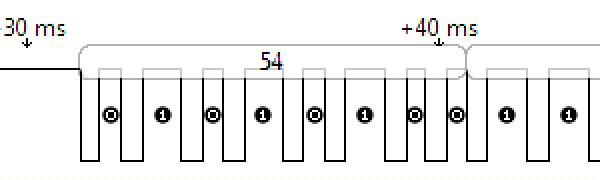
At this point, I don’t know if the (500, 500) pair represents a 1 or 0, so we’ll just pick one for now. I also don’t know if the bits are reconstructed from left-to-right or right-to-left. I made all of these into configurable options so that I could easily try out various combinations. The data can also be exported into a text file for further analysis.
Decoding the Data
To decode the actual data, I needed to generate some known data first. I captured the waveform from 0.0kg and gradually applied my weight onto the scale to cause the values to advance in an ascending order.
I played with the decoding configuration and exported the values until the data looked like it was increasing and ended up with this:
 time[s], values
         :
3.141592, AB 00 00 00 AA
         :
6.042467, AB 80 00 4B 76
6.170977, AB 80 00 57 82
6.812532, AB 80 00 6B 96
7.069715, AB 80 00 91 BC
7.198203, AB 80 00 A5 D0
7.326531, AB 80 00 B5 E0
7.455037, AB 80 00 C6 F2
7.583412, AB 80 00 DA 06
7.711770, AB 80 00 EC 18
7.840168, AB 80 01 03 30
7.968462, AB 80 01 24 50
8.096935, AB 80 01 34 60
8.225057, AB 80 01 34 60
8.353910, AB 80 01 5E 8A
8.482273, AB 80 01 89 B6
         :
         :
The bytes are actually encoded from left-to-right (first bit is the MSB), and the (500, 500) pair represents a 1 while (500, 1000) represents a 0. The data encoding at this point looks like it’s in ascending order, but I still had no idea what they mean.
Next, I tried to get the bathroom scale to display different weights, so as to get a mapping of encoded values and the displayed weight. It would be best to record consecutive weight values (e.g. 10.0kg, 10.1kg, etc) but realistically it was difficult to control the amount of pressure I exert on the scale, so I just recorded a bunch of data as close to each other as possible.
  :
  :
AB 84 00 41 70 -  6.5kg
AB 84 00 43 72 -  6.7kg
  :
  :
AB 84 00 BE EE - 19.0kg
AB 84 00 C0 F0 - 19.2kg
AB 84 00 C7 F6 - 19.9kg
AB 80 00 CC F8 - 20.3kg
AB 84 00 D2 02 - 21.0kg
AB 80 00 DC 08 - 22.0kg
AB 84 00 DD 0E - 22.1kg
  :
  :
From these captures, notice that the representation for 22.0kg and 22.1kg differ by 1 in the second last byte; 21.0kg and 22.0kg differ by 10 (0xA) in the same byte position. If you convert 0xDD to decimal, you will get 221 and that is the displayed weight multiplied by 10 to get rid of the decimal point.
Now that we have figured out how the weight is represented, let’s see what the other bytes are.
Remaining bytes
The first byte is a constant identifier (0xAB), and the weight is represented by the 3rd and 4th bytes. Thus we are left with the 2nd and last bytes, which are also changing.
The 2nd byte seems to indicate the measurement status. When sufficient weight is on the scale, it changes from 0x00 to 0x80 and stays there until the measurement is stable. After the weight is no longer varying, this byte changes to 0x84 for a short period, followed by 0x8C. Both 0x84 and 0x8C causes the display unit to blink, so I’m not sure why there are 2 values to indicate a stable weight.
The last byte is the checksum byte. Notice that when the second byte changes, the last byte does too. Checksum bytes are typically computed by XOR-ing all or some bytes, but in this case, it’s an addition capped to a single byte using mod. The following Python code snippet describes the checksum algorithm that I have reconstructed:
# input bytes
bytes = [0xAA, 0x00, 0x00, 0x00]

checksum = 0
for n in bytes:
    checksum += n
    checksum %= 0xFF

# set last bit to zero
checksum &= ~1
Note that the last byte only has 7 bits (total data length of each burst is 39 bits). The analysis plugin fills that missing last bit with zero, so the checksum algorithm also sets it to zero to make sure the values match up.
Being able to correctly compute the checksum ensures that the received IR data was not corrupted (to some extent).
Repurposing the Display?
With the protocol reverse-engineered, we could send the same IR signals to activate and display whatever numbers we want, although I haven’t really thought of a good use for this yet.
While the specifications say it could go up to 150kg max, the display can actually indicate up to 153kg (0x05FA) before it displays Err.
There’s also a button hidden inside the battery compartment that allows you to toggle the unit of measurement to pounds (lb). The display unit will then convert the transmitted values in kilograms to pounds internally and show that value.
Recording Measurements to the Cloud
The whole point of reverse-engineering the bathroom scale protocol is to automatically record the readings for easy plotting and exporting, inspired by the Adafruit tutorial for logging humidity & temperature values to Google Docs using the gspread Python library.
The only Internet-connected device I had was the Raspberry Pi. Recording bit transitions on the Pi’s GPIO pins is challenging (for instance, polling the pins would be detrimental to battery life) but fortunately I found the lirc_rpi kernel module, which solved all of my problems at once. This kernel module will monitor an IR receiver hooked up directly to a GPIO pin using interrupts. It is also shipped with Arch Linux, so I don’t have to compile it myself.
You have to load the kernel module manually, like so:
modprobe lirc_rpi gpio_in_pin=4
This selects GPIO 4 as the pin connected to the IR receiver. Note that GPIO 4 is NOT pin 4. Refer to the wiki at RPi Low-level peripherals to see the pin mapping. I’m using GPIO 4 (pin 7) because it’s closest to pin 1 (3V3 supply) and pin 6 (GND).
The lirc_rpi module creates the /dev/lirc0 device, which LIRC uses to send and receive IR signals. To avoid installing LIRC (yes, I’m weird like that), I wrote a Python script that talks to the /dev/lirc0 device directly. The protocol is rather straightforward if you see technical document for LIRC under the “Formats” section.
Now all I need to do is to place the Raspberry Pi near the bathroom scale (I’ve tested it works up to about 60cm) and stand on it. The Python script will only be active when infrared signals are received and data starts flowing out of /dev/lirc0. The script receives all IR signals and parses them until it finds a transmission in the format we just decoded. To verify that the data is valid, it ensures that the transmission starts with 0xAB and that the checksum is correct.
The script waits until the status byte changes to 0x8C for a few consecutive measurements before it submits that weight to the Google Docs spreadsheet along with the current timestamp. No more standing on the bathroom scale, waiting for the result and copying it to some Excel spreadsheet for graphing — perfect for the lazy me!
Wiring It Up
I have since added a status LED to indicate the status of the measurement, as well as a systemd service file that starts the script automatically on boot. This wraps up the project into something that is usable by itself without any display. When infrared signals are being received from the bathroom scale, the script blinks the status LED. After the weight stabilizes, the status LED turns on solid for a few seconds until the data has been sent to Google Docs, then turns off.
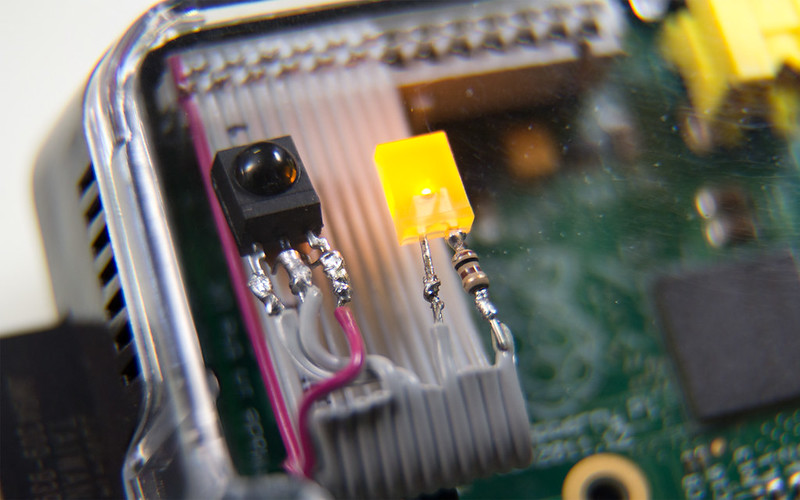
This addon consists of a 26-way IDC connector that I got from Mouser, a ribbon cable salvaged from an old IDE cable, and the components soldered on directly. I’m using the Vishay TSOP4138 as the IR receiver and it works pretty well, unlike the Waitrony part that I took out from the junk box. I strapped a 0.1µF capacitor to the back of it, just in case. Notice that while I’m using only 5 connections, it is more robust to punch down all 12 wires into the IDC connector:
- Pin 1: 3V3
- Pin 6: GND
- Pin 7: GPIO 4 as IR input
- Pin 9: GND (for LED)
- Pin 12: GPIO 18 as LED output
Using an IDC connector is the best way to fit everything into the awesome Adafruit Pi case. The transparent top cover lets infrared through and the status LED is also visible, so there’s no need to drill holes or anything.
Debugging Hints
Initially I had some problems getting the Waitrony IR receiver to work with the Raspberry Pi. The circuit was made on a small breadboard and was causing spurious transitions. According to the datasheet, I had to insert a small value resistor (less than 100 ohms) in series with Vcc and a 47µF electrolytic capacitor across Vcc and GND “in case of noisy power supply”. After I did that, the IR receiver was functioning perfectly. Note that the Vishay IR receiver I used later was more tolerant of noise in the power supply.
To verify that the IR receiver is being correctly detected, you can pass debug=1 to the lirc_rpi module. It outputs debug messages to syslog like these:
kernel: lirc_rpi: auto-detected active low receiver on GPIO pin 4
kernel: lirc_rpi.0: lirc_dev: driver lirc_rpi registered at minor=0
kernel: lirc_rpi: driver registered!
You can also use a utility bundled with LIRC called mode2 to check that the IR signals are correctly received, and that nothing is being received when idle.
Download
The script and setup instructions are available for download on the cloud-bathroom-scale Bitbucket repo.

It would be a great assist to those desiring to mimic your work if you would reveal which seller was the source of your scale. In my travels, I have never seen the scale which you used. Good work!
Hi Bob, I think the most common source of this scale is probably eBay. You can search for the model number I’ve mentioned. I got mine at a local supermarket (called Cold Storage) which specially ordered these in bulk – it states so on the last page of the instruction manual. Hope that helps!
Hello. Thank you for sharing your great hack. In your Python script to show how the checksum calculation works, you should get the remainder to 256 instead of 255. So it would be:
checksum %= 0x100
Ahh thanks for pointing that out! Let me go verify that the checksum algorithm works correctly before I make the changes. 🙂
UPDATE: I’ve confirmed that the algorithm indeed uses mod 0xFF and NOT mod 0x100.
Really nice, thanks for sharing!
[…] is getting closer and we all want to watch our weight. Darryl Tan shared a pretty cool hack that could help you out. He came across a scale with a wireless […]
[…] hacker Darrel Tan has a great write-up about his experience with hacking a Chinese-made bathroom scale for cloud connectivity using a Raspberry Pi. His bathroom weighscale has a separate display part that receves the weight […]
[…] Being able to record the readings from a bathroom scale would help a person monitor his weight easily. This is the purpose of providing a tweak to the bathroom scale and being able to upload automatically the data. […]
Very clear tutorial – and would love to see it work – I just have a problem when running the test program
File “./cloud-bathroom-scale.py”, line 316, in
main()
File “./cloud-bathroom-scale.py”, line 266, in main
record_weight(Lock(), credentials, args.spreadsheet_key, 0.0)
TypeError: record_weight() takes exactly 3 arguments (4 given)
(this is done without having attached the LED and the IR receiver yet)
Steve
Hi Steve, thanks for bringing that to my attention. I’ve fixed it in the latest version. Let me know if you are still having problems.
darell
Thanks very much – no bugs now. You don’t actually see anything in the spreadsheet (e.g timestamp) – but in the “revision history” I definitely see the record of the last update at the time when I ran the test script from the pi. Excellent! Tomorrow I will try with the LED and IR receiver
Steve
Hi Steve, it should have appended a new row. As per the Adafruit tutorial, you have to remove all the rows in the spreadsheet first. The new record is inserted at the last row.
Hi Darell
Now with led and ir connected – getting this error:
(cloud-bathroom-scale)pi@raspberrypiscales ~/cloud-bathroom-scale $ ./cloud-bathroom-scale.py 1
Traceback (most recent call last):
File “./cloud-bathroom-scale.py”, line 317, in
main()
File “./cloud-bathroom-scale.py”, line 272, in main
led = gpioled(args.led)
File “./cloud-bathroom-scale.py”, line 88, in __init__
raise ValueError(‘GPIO pin %d has not been exported’ % pin)
ValueError: GPIO pin 18 has not been exported
(cloud-bathroom-scale)pi@raspberrypiscales ~/cloud-bathroom-scale $
Could this be (my) wiring error (led in wrong pins) – or something else?
Thanks
Steve
Hi Steve, you need to “export” the GPIO pin for the LED first, by running these 2 commands as root:
Hi, can you show scale pcb with ir transmitter ?or send be by email.
Hi Vitaliy, I can try to open it up to get some photos, but before that can I ask what are you looking for on the PCB? I’m expecting the PCB to be small with just a chip-on-board blob that connects to the IR and Wheatstone bridge (and various passive components).
Hi, can you write me checksum calculation in c-language?
One problem would be a balance. From standby to power up the balance? It should measure itself 4-5 times a day. Remote balance sheet to use as a long distance from me.
Hi Laszlo, I’m afraid I don’t understand what you are trying to say. The scale (or balance) has automatic power up and power off features. When you stand on the scale, it turns on and starts transmitting; it also turns off automatically after a short time. Since it uses IR, it can transmit to the Pi up to maybe 30-60cm away, but not further than that. If you really want it further, you can use a IR repeater for TV remotes to repeat the signal to your Pi. The idea of this project is to put the Pi near the scale and every time you stand on the scale, it records the weight automatically. You can do this as many times as you want throughout the day. Hope that helps.
Excuse me if I do not understand.
A hive like to measure the distance . 2-3 Can you measure how much it grew daily.
If the first measure after it goes to sleep and does not measure more than just using your hand and press on for a moment.
The infrared connection between the balance and cause rasperry . The trouble with self- measurement . From me the hive is 10-20 km . Internet connection is correct . The scale of the problem waking 2-3 times a day to measure itself and send it to Google
Interesting. Are you talking about measuring the weight of a bee hive? If that were true, I would re-use the scale but remove the existing circuit and connect the strain gauge directly to a specialized ADC so that I can read the weight automatically every few hours.
Yes, I would like to balance a hive from the infrared balance sheet + raspberry .
In the meantime, sent the temperature and humidity of the draw or photo .