As I was perusing the SB-Projects site on the different IR protocol formats, I decided to make a summary but later found out that it was a pretty standard thing, as documented by a Vishay document “Data Formats for IR Remote Control” (pdf).
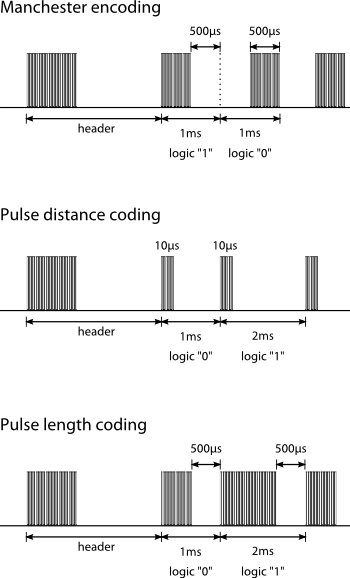
The infrared remote control signals are layered on top of a carrier signal of 36 or 38kHz, therefore the signal can only be “on” or “off”. A transmission typically starts with an a burst (“on” state) that is used for the Automatic Gain Control (AGC) circuitry in the receiver, followed by the “off” state and the actual data transmission.
There are 3 basic types of data transmission formats, which are illustrated in the following diagram. Protocols can be based on these transmission formats, but need not necessarily conform to them.
So how do you know what your remote control uses? And how do you capture the sequence so that you can re-transmit it from an IR diode?
 However, it’s a real chore to hook this up, especially since everything on the breadboard like the crystal, FTDI header and reset button and pullup resistor are all inserted like any other component. It is more convenient to have a ready-built board for prototyping, where you don’t have to worry about the Arduino components.
