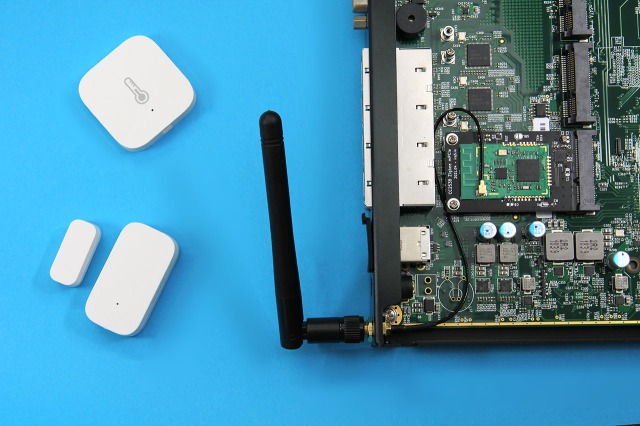
The advantage of Zigbee devices is that they are very low power, and they communicate in a wireless mesh network. The sensors are small and can work off a CR2032 coin cell for at least 2 years, maybe more. Depending on the type of sensor, they cost around US$10 and are readily available from various manufacturers, such as Xiaomi, Aqara (pictured below) or IKEA under their TRÅDFRI range of products.
You typically pair these sensors with a Zigbee gateway, which speaks the IEEE 802.15.4 protocol and relays the information (e.g. sensor readings) to either your mobile app or stores it in the cloud (or the gateway itself). But as you can imagine, a Raspberry Pi with the right adapter can do this job and offer more flexibility.
The usual route for such a DIY gateway is to use zigbee2mqtt. It communicates with supported Zigbee adapters (via the TI Z-Stack test API) and behaves as a software-controlled Zigbee coordinator.
For long-term sensor data storage, I’ll be using InfluxDB, since I’m already doing data collection from collectd that runs on my ASUSWRT router.
Zigbee Adapter
A common, low-cost Zigbee adapter is the TI CC2531 USB stick. You can get it easily on AliExpress but there isn’t a case for it. On the more polished end, there is also the ConBee II stick. However, I didn’t want a dongle sticking out of my Pi for this. With an internal antenna, the wireless range would be limited, but if it has an external antenna, it is even more bulky.
Since I am already using a PCengines APU4 as my network router, why not use that? The APU4 platform was designed to be a router, offering 4 Gigabit Ethernet ports, and 3 mPCIe slots that are meant to be populated with GSM modems or WiFi cards. The aluminium case even has two holes already cut out for RP-SMA antennas.
I designed a mPCIe card that holds the CC2538 + CC2592 PA Zigbee module. This module seemed not bad, is available on AliExpress and integrating it would mean not having to deal with the RF layout and parts selection.
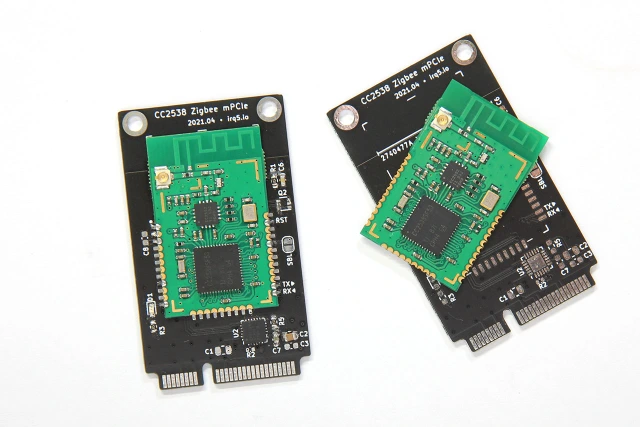
While the CC2538 does speak USB natively, I was unsure if you can upgrade the firmware over this CDC serial device. You need the firmware code, the CC2538 needs to be capable of self-programming and a suitable flashing protocol is required, with a Linux-based implementation available. These are non-trivial requirements and I wasn’t going to take on this endeavour by myself, so I chose the easy way which was just to include a USB UART IC — the CP2102N.
With the serial port, you can flash a new firmware easily using cc2538-bsl, a Python-based tool. The RTS & DTR pins from the CP2102N are also wired up, so you don’t need to press any buttons to enter BSL mode; the tool also natively supports this. This allows you to flash the mPCIe card while it is still in the case.
Assembly & Testing
To be honest, I haven’t had very good success with surface mount soldering, particularly QFN parts. The CP2102 is the only other major component on the board, aside from the Zigbee module.
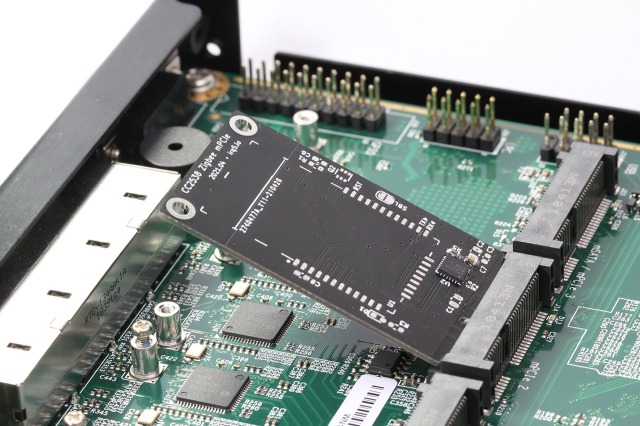
I soldered on the CP2102N with a resistor and a decoupling capacitor for good measure, and inserted the card into the mPCIe slot, like a USB stick. The Linux kernel recognized it.
With that out of the way, I proceeded to solder on the Zigbee module and flashed the firmware into it.
The firmware is actually a modified version of TI’s Z-Stack, for use with zigbee2mqtt. Precompiled versions for the CC2538 module can be found here: https://github.com/jethome-ru/zigbee-firmware/tree/master/ti/coordinator/cc2538_cc2592. As the mPCIe card speaks to the module using UART, the UART version of the firmware should be used.
If you are interested, you can find more details in my Zigbee mPCIe card project on GitHub.
Alternatives
If you are looking for off-the-shelf adapters, you can find a list of other supported ones here. Most of them are dongles, and a few are Raspberry Pi hats.
It looks like CC2652x-based devices are the currently recommended choice.
zigbee2mqtt Setup
This one is rather straightfoward. I opted to use the official koenkk/zigbee2mqtt Docker image because I didn’t want the NodeJS crap polluting my system.
For security, you will want to change these values in your configuration.yaml file:
advanced:
  pan_id: 0x1234
  ext_pan_id: [0x69, 0x72, 0x71, 0x35, 0x2e, 0x69, 0x6f, 0x20]
  network_key: [124,252,75,212,53,216,169,36,239,206,108,188,162,62,13,55]
Please use different values than what you see here. You can generate your own random numbers easily using this CyberChef recipe.
InfluxDB for Sensor Readings
InfluxDB is a time-series database. I’ve been using version 1.x for some time now to directly ingesting collectd stats, over the collectd binary protocol. However, InfluxDB 2.0 removed these direct ingest features. Instead, a collection agent Telegraf now takes over that job. I contemplated sticking with version 1.x, but their plan was to support v1.8 (the last major version) only until the end of 2021.
I have seen other blogs talk about getting data into InfluxDB (from zigbee2mqtt) with a script that subscribes to the MQTT broker, then formatting those messages into the desired format to be inserted into InfluxDB. I have considered that, but I believe Telegraf is a more robust solution, capable of handling retries, batching, etc. and more importantly, it also has support for ingesting collectd data too. This means with a single Telegraf instance, I can ingest both Zigbee sensor data and collectd data that I am currently collecting.
Telegraf Configuration
Telegraf has many plugins for data input and output. For our purposes, we are interested in the MQTT Consumer input plugin and the InfluxDB_v2 output plugin.
Ingesting data from MQTT isn’t difficult. The challenge lies in shaping the data exactly the way you want to store it in the database. A typical MQTT consumer is configured as follows:
[[inputs.mqtt_consumer]]
  servers = ["tcp://localhost:1883"]
  topics = ["zigbee2mqtt/#"]
  data_format = "json"
Using this basic configuration, your data would look like this (in the InfluxDB Line Protocol format):
mqtt_consumer,topic=zigbee2mqtt/0xmyaddress battery=100,linkquality=98,temperature=30.5,...
It would also include the zigbee2mqtt/bridge MQTT topics, which I am not really interested in recording to the database. To avoid this, I have seen some examples explicitly listing the sensor(s) of interest zigbee2mqtt/0xsensor1, zigbee2mqtt/0xsensor2… which is also definitely not what I would want to do.
I want my InfluxDB database to contain a logical schema, like so:
zigbee,dev=0xsensor1 temperature=30.5,linkquality=98,...
Let’s add on to the Telegraf configuration, and process the MQTT topic name with the Regex processor to get just the sensor’s friendly_name or address:
  .
  .

  # rename our measurement,
  # and use a sane "tag" for the sensor
  name_override = "zigbee"
  topic_tag = "dev"

# strip the base topic (typically "zigbee2mqtt")
# from the dev tag using the regex processor
[[processors.regex]]
  namepass = ["zigbee"]

  [[processors.regex.tags]]
    key = "dev"
    pattern = '^zigbee2mqtt/(?P<device>.+)$'
    replacement = "${device}"
With that, we have fixed up the measurement schema. We also need to prevent the bridge topic from being recorded, using the tagdrop filter at the mqtt_consumer:
# don't include messages about the z2m bridge itself
# also note the single square brackets used here
[inputs.mqtt_consumer.tagdrop]
  dev = ["zigbee2mqtt/bridge/*"]
Other Improvements
Note that InfluxDB can store nanosecond precision timestamps in the database. However, if you use a coarser precision, such as seconds, then the records can compress better. I guess internally they can discard or optimize away the extra resolution.
I chose to attach a precision = "100ms" to the MQTT consumer input block. I would go for seconds, but I was afraid that the door contact sensor events happen faster. If that happens, values that have the same second timestamp will be overwritten. I think a 100 millisecond resolution ought to prevent that.
This was the same issue I noticed back when storing collectd data points, which was why I built features into my collectd plugin to discard the sub-second resolution from the timestamp. The same features are also available in Telegraf, under the [agent] tag, controlled by the interval and precision settings.
Debugging Telegraf
To test Telegraf, you can use the --test --test-wait 60 while you generate some MQTT messages, for example by briefly press the button on the sensor. The LED should flash and it should trigger an update.
$ telegraf --config /etc/telegraf/telegraf.d/mqtt.conf --test --test-wait 20 --debug
2021-09-14T08:01:41Z I! Starting Telegraf 1.19.2
2021-09-14T08:01:41Z D! [agent] Initializing plugins
2021-09-14T08:01:41Z D! [agent] Starting service inputs
2021-09-14T08:01:41Z I! [inputs.mqtt_consumer] Connected [tcp://localhost:1883]
> zigbee,dev=0x00697271352e696f,host=apu4 battery=100,humidity=68.46,linkquality=128,pressure=1004.4,temperature=31.92,voltage=3005 1640995200148229287
2021-09-14T08:02:01Z D! [agent] Stopping service inputs
2021-09-14T08:02:01Z D! [inputs.mqtt_consumer] Disconnecting [tcp://localhost:1883]
2021-09-14T08:02:01Z D! [inputs.mqtt_consumer] Disconnected [tcp://localhost:1883]
2021-09-14T08:02:01Z D! [agent] Input channel closed
2021-09-14T08:02:01Z D! [agent] Processor channel closed
2021-09-14T08:02:01Z D! [agent] Stopped Successfully
Note that using this method is not sufficient to test Telegraf batching and timestamp precision. For that, you will want to use [[outputs.file]] with files = ["stdout"]. Once Telegraf batches up the MQTT messages to be written, it will be output to stdout, just as it would send to InfluxDB when operating normally.
Data Visualization
Since InfluxDB 2.0 now integrates everything including the kitchen sink, they have also conveniently provided a Dashboards feature that can be used to visualize your data from the web UI:
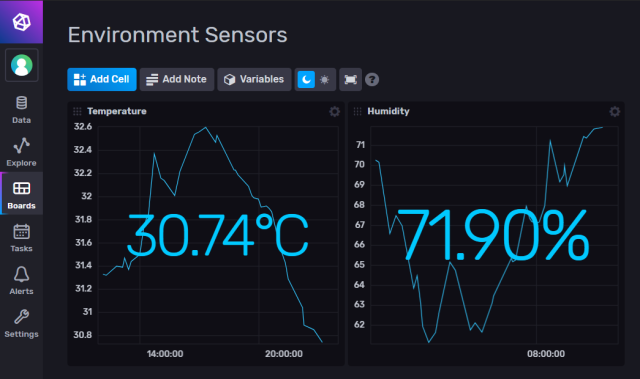
This is convenient because we don’t need to install Grafana for some quick data visualization like this. However, it is not as powerful, so I don’t think it can be a complete replacement.
Home Automation
Besides just collecting environmental sensor data, home automation is something I want to explore further. You can add switches or contact/motion sensors and react to them when they are activated/toggled.
It could be implemented using a mature platform like Home Assistant, or just simple programs (even shell scripts) that subscribe to MQTT messages. Just for fun, here’s a snippet that reacts to a contact sensor, using mosquitto_sub as a MQTT subscriber and some command-line magic1:
mosquitto_sub -t 'zigbee2mqtt/#' |
  jq --unbuffered -R 'fromjson?|.contact' |
  sed -n $'/^false/{c \033[41;1m\033[2J\nn};c \033[0m\033[2J'
Surprisingly, the response time is pretty quick.
Further Reading
My working Telegraf configuration can be found here: https://gist.github.com/geekman/9272f3edb41b1692b74c130bf25734b3
More examples using Telegraf’s regex processor:
http://wiki.webperfect.ch/index.php?title=Telegraf:_Processor_Plugins
During my research into the CC2538 module, I came across some Russian sites which also use it. One talks about adapting the raw module for use in a single-board computer, and another builds a USB adapter around it. They were a great help in figuring out the GPIO pins for status indicators, as well as what firmware to use.
– https://mysku.ru/blog/aliexpress/79984.html
– https://modkam.ru/2019/08/07/koordinator-zigbee-v3/
– https://github.com/egony/MODKAM-STICK-V3/wiki
- Note that the snippet was written for Bash and using GNU sed for brevity. ↩
