Using U2F for Door Access Control Systems

I was looking at trying to securely implement a door access control system. This usually involves some kind of card that you tap at a reader and the door unlocks.

Because it uses NFC, the NFC reader and electronics can be located safely on the inside, leaving no exposed DIY electronics on the outside for attackers to fiddle around with. Here’s an example project using a 3D-printed enclosure:

photo of a DIY NFC door lock found on Instructables.com, with all the electronics & parts on the interior side of the door

A lot of those DIY projects work, but they are just not secure:

Just look at the code and you will see what I mean. They generally look like this:

uint32_t uid = nfc.readCardId();    // read the card's unique ID
if (uid == 0xAAAAAAAA || uid == 0xBBBBBBBB || ...) {
    unlock(); // YES!!
}

Unfortunately, consumer smart locks like a Yale or Samsung do pretty much the same thing, without hard-coding UIDs of course. When you enroll cards, the door lock will simply record the UID and will unlock when you present a card (or tag) with that UID. MIFARE Classic cards are commonly used for this purpose because they are very inexpensive. They are factory-programmed with a unique identifier stored in sector 0, which is read-only.

Continue reading

Data Encryption on Firefox Send

If you haven’t heard, Firefox Send is a service that solves the problem of sending large attachments without going through email. It does this in a privacy-preserving manner by encrypting the file in your browser first, before upload.

The concept is simple:

  1. An encryption key is generated in your browser
  2. Your file is encrypted with that key before being uploaded to the server.
  3. The download URL is returned by the server,
    but will only work after the browser appends the secret key to the URL fragment.

Note that URL fragments are never sent to the server. They are often used for page anchors, and sometimes to keep track of local state in SPA.

This has been made possible through the use of Web Crypto API exposed via JavaScript.

Technical Details

The code that powers Firefox Send is actually open source, so you can run your own server, or read the code to figure out exactly how it works. The encryption details are documented in docs/encryption.md.

A master key is first generated and from it, a few keys are derived using HKDF SHA-256. The derived key length depends on its purpose, so for AES-128 encryption, the key will be 128-bit. Oddly though, the Subtle Crypto API returns a a 512-bit key for HMAC SHA-256, which had me stumped for a while. I wrote some code that you can try out online.

Because HKDF is based on a hash algorithm, derived keys are inherently not reversible to obtain the master key from which they were derived (unless the algorithm itself is somehow broken).

3 keys are derived from the master key:

  1. Data Encryption key. Used to encrypt the actual file contents.
  2. Authentication key. Given to the service and used to authenticate future downloaders.
  3. Metadata key. Used to encrypt the upload manifest (filename and size information) for display.

keys derived in Firefox Send

Continue reading

Crypto-Erasing BitLocker Drives

These days with larger and larger drive capacities, erasing stored data takes longer and longer. Another problem is also the inability to do so when the time comes, due to bad sectors or hardware failures. Just because the data is not accessible by you does not mean that it is also inaccessible to someone else with the know-how.

Cryptographic erasure to the rescue!

Crypto erase simply erases the encryption key that is used to encrypt the data on your drive. This is the primary reason why I encrypt my drives.

Oddly, I have not found anyone talking about BitLocker crypto erasure or doing it. The closest I have seen is manage-bde -forcerecovery, which removes all TPM-related key protectors. This is briefly described in a TechNet article titled BitLockerâ„¢ Drive Encryption and Disk Sanitation.

But what if we are not running Windows? What if the disk is not a Windows boot drive that is protected by a TPM key protector?

In order to erase the (key) data, we first need to know how the data is stored on disk. For open-source FDE implementations, this is easy because the disk format is well-documented, but BitLocker is not exactly open.

BitLocker Disk Format

BitLocker was first introduced in Windows Vista and has gone through changes since then. Some changes were made to the format in Windows 7, but has largely remained unchanged through Windows 8 till 10.

For LUKS, it is simple – there is a LUKS header at the start of the disk, followed by the encrypted volume data. For BitLocker, it is slightly more involved, probably due to backward-compatible design considerations.

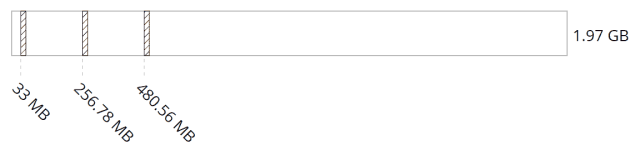
The header at the start of the partition is a valid boot sector (or boot block), so not all BitLocker information can be stored within. Instead, this volume header points to the FVE metadata block where most of the data is kept. In fact, there are 3 of these for redundancy. This metadata block is what holds all the key material.

The metadata blocks are spaced (almost) evenly apart, located near the start of the volume.

# blwipe -offset 0x2010000 bitlocker-2gb.vhd
metadata offset 0: 0x02100000
metadata offset 1: 0x100c8000
metadata offset 2: 0x1e08f000
metadata block 0 (size 65536): parsed OK
metadata block 1 (size 65536): parsed OK
metadata block 2 (size 65536): parsed OK

The first metadata block usually begins at 0x02100000. This illustration depicts the locations for a 2 GB volume:

Diagram of disk layout with FVE metadata blocks marked out

If there are 3 of these blocks, how do we know know which ones contain valid data?

Continue reading

Framework for Writing Flexible Bruteforcers

When writing a bruteforcer, it’s easiest to think of it as mapping some kind of output to a monotonically-increasing number.

Like for one of the solved PlaidCTF question, the answer string was composed from the eight letters “plaidctf”, which conveniently is a power of 2, meaning each output character can be represented with 3 bits. To write a bruteforcer for a string composed of these characters, you might imagine generating a 3-bit number (i.e. from 0 to 7) then mapping it to the character set for one output character, or a 30-bit number if the output string was 10 characters. Unsurprisingly, this was exactly what I did for my solver script. The output string was generated from a BitVector of 171 * 3 bits.

But what if the output was composed of several different pieces that cannot be represented uniformly as a set of bits?

One solution might be to emulate such a behaviour using an array of integers, like how I modified my solver script in version 2 to handle a character set of arbitrary length.

In this post, I will walk-through writing a basic, but flexible, bruteforcer with accompanying code snippets in Go.

Keeping State

Continuing on the CTF puzzle, the BitVector was replaced with an array of Ints. Each Int will represent one character of the output string. We can thus represent the state like so (for simplicity, let’s limit the output string to 2 characters):

type state struct {
    digit [2]int
}

In order to increment each digit, we can write a function that increments state.digit until a certain number, then resets it to zero.

To make it generic, we will write a function that returns another function that manipulates a digit position, so we don’t have to copy & paste the code for each digit position:

// returns a function that manipulates the digit at given pos
func digitManipulator(pos int) func(*state) bool {
    return func(s *state) bool {
        s.digit[pos]++
        if s.digit[pos] == MAX_NUMBER {
            s.digit[pos] = 0
            return true
        }
        return false
    }
}

We will talk more about the boolean return value later.

Continue reading

Cracking iTunes Backup Passwords with hashcat

Following the recent announcement of LUKS support in hashcat, I noticed that there have been some commits to support iTunes Backup passwords as well.

This is only useful if the backup was encrypted by setting a backup password on the iOS device. If the backup is not encrypted then all the files are in clear and there is nothing to bruteforce.

The keys used to encrypt the backup are stored in the BackupKeyBag, which can be found in the Manifest.plist file. This keybag is a binary blob, the format of which has already been documented by researchers from Sogeti ESEC Lab.

I have written a simplified script which dumps the BackupKeyBag.
You will need the Python bindings from libplist for the script to work. If you cannot get it to work, you can try the Perl script from philsmd instead.

Speeding up iOS Backups

iOS device backups usually take a while, depending on how much storage has been used on your device.

The iOS backup process is driven by the device itself, through the BackupAgent process. This process treats the host PC like a dumb disk store, by sending it commands like DLMessageCreateDirectory, DLMessageUploadFiles, DLMessageRemoveFiles, DLMessageGetFreeDiskSpace, etc. so that it can determine what has been backed up previously and what to send/update for incremental backups.

For password cracking, we don’t need the entire 64 GB (or God forbid, 128 GB) of data on the iOS device. We just need the Manifest.plist, which is typically less than 50 KB. But because the backup process is controlled by the device and not the PC, we can’t simply ask it to send over that single file. Sometimes when we setup a VM with libimobiledevice, we might also not have allocated such a large virtual disk. Of course when I say “we”, I really mean “I”.

Continue reading