Crypto-Erasing BitLocker Drives

These days with larger and larger drive capacities, erasing stored data takes longer and longer. Another problem is also the inability to do so when the time comes, due to bad sectors or hardware failures. Just because the data is not accessible by you does not mean that it is also inaccessible to someone else with the know-how.

Cryptographic erasure to the rescue!

Crypto erase simply erases the encryption key that is used to encrypt the data on your drive. This is the primary reason why I encrypt my drives.

Oddly, I have not found anyone talking about BitLocker crypto erasure or doing it. The closest I have seen is manage-bde -forcerecovery, which removes all TPM-related key protectors. This is briefly described in a TechNet article titled BitLocker™ Drive Encryption and Disk Sanitation.

But what if we are not running Windows? What if the disk is not a Windows boot drive that is protected by a TPM key protector?

In order to erase the (key) data, we first need to know how the data is stored on disk. For open-source FDE implementations, this is easy because the disk format is well-documented, but BitLocker is not exactly open.

BitLocker Disk Format

BitLocker was first introduced in Windows Vista and has gone through changes since then. Some changes were made to the format in Windows 7, but has largely remained unchanged through Windows 8 till 10.

For LUKS, it is simple – there is a LUKS header at the start of the disk, followed by the encrypted volume data. For BitLocker, it is slightly more involved, probably due to backward-compatible design considerations.

The header at the start of the partition is a valid boot sector (or boot block), so not all BitLocker information can be stored within. Instead, this volume header points to the FVE metadata block where most of the data is kept. In fact, there are 3 of these for redundancy. This metadata block is what holds all the key material.

The metadata blocks are spaced (almost) evenly apart, located near the start of the volume.

# blwipe -offset 0x2010000 bitlocker-2gb.vhd
metadata offset 0: 0x02100000
metadata offset 1: 0x100c8000
metadata offset 2: 0x1e08f000
metadata block 0 (size 65536): parsed OK
metadata block 1 (size 65536): parsed OK
metadata block 2 (size 65536): parsed OK

The first metadata block usually begins at 0x02100000. This illustration depicts the locations for a 2 GB volume:

Diagram of disk layout with FVE metadata blocks marked out

If there are 3 of these blocks, how do we know know which ones contain valid data?
Continue reading

PCBWay PCB Review

PCBWay is a PCB manufacturer that prides itself on quick turnaround. You can learn about CNLohr’s sucess story here. They also offer detailed tracking of your order’s progress on their website.

They have reached out to me and kindly offered to sponsor the boards for this particular project, which I will be talking about in the coming weeks. As the cost of these boards were more expensive (compared to their “normal” orders), I had to pay for shipping myself.

With each PCB project, I find more and more methods of testing PCB manufacturers. This time, it’s with a PCB that is inserted directly into your USB socket.

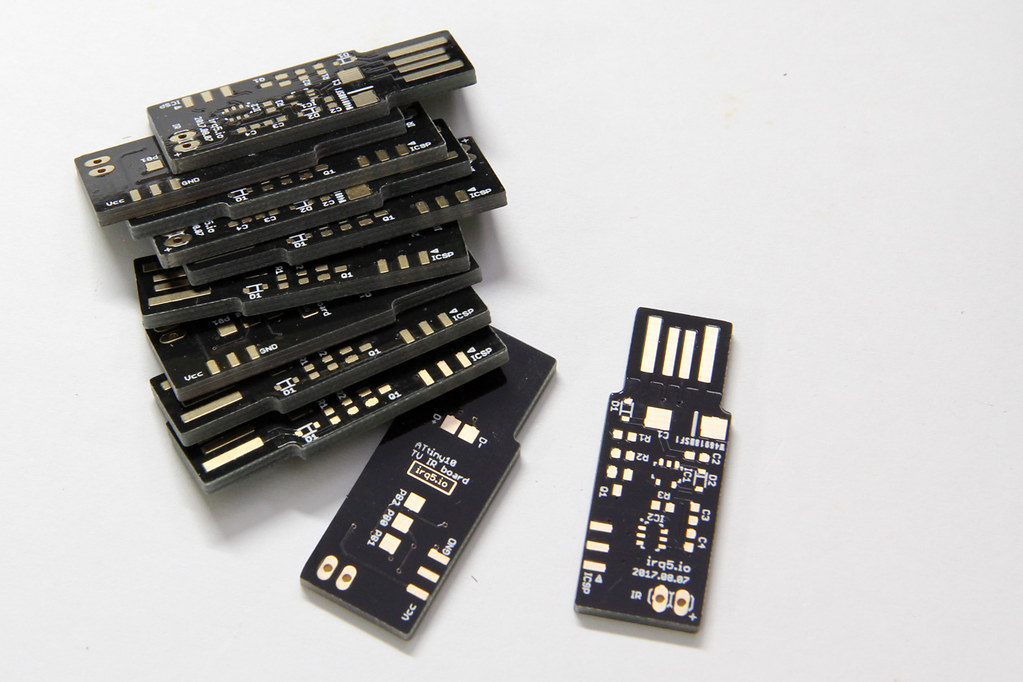
project PCBs

The requirement for such a board is 2 mm thickness. The USB connector size is standard, so the usual 1.6 mm PCB thickness isn’t going to work unless you pad the connector area.

Also, I opted for gold fingers on the USB connector contacts. This is usually done for contacts on the board edge that will be inserted into some mating connector (like PCI cards and USB connectors such as this).

They also offer matte black & matte green colors. I haven’t seen matte colours being offered at other board houses so far. I would have loved to try them out, but that would have bloated the cost beyond my comfort level.

Order Process

The order flow for PCBWay is a bit different because you submit your gerbers without making payment first. This allows their engineers to take a look at the design before you actually pay.

Most other systems I’ve used are largely automated. After you submit your gerbers, they typically don’t expect any problems and so they collect payment from you first.

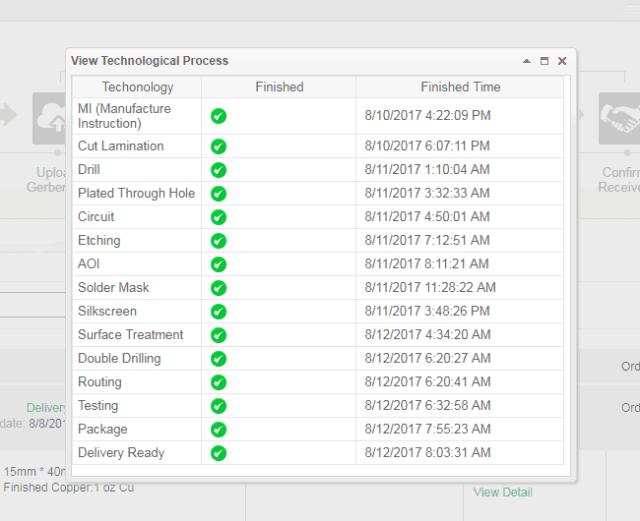
I uploaded the gerbers on the 8th Aug and I tracked my order progress online. Their website allows you to track the detailed progress of your board as it moves along the manufacturing process. For small runs like this one, it is not crucial but if you were doing a large project with panels of many boards, this would definitely be handy.

table of PCB production processes and their completion times

They started manufacture 2 days later (on the 10th) and completed everything by 12th. It was not until the 14th that they actually shipped the boards out and provided me with a tracking number.

Here’s a summary of the timeline:

  • 08: Gerber files submission
  • 10: start of PCB manufacture
  • 12: boards completed
  • 14: boards shipped (via registered post)
  • 24: boards received

Continue reading

Flare-On 2017 Write-up: “pewpewboat.exe”

Flare-On 2017 Challenge #5 — pewpewboat.exe

As usual, the first thing to do when tackling the challenge is to run the binary first, to see what it does. You will soon learn that it’s not actually a Windows executable, but rather a 64-bit Linux ELF.

$ ./pewpewboat.exe
Loading first pew pew map...
   1 2 3 4 5 6 7 8
  _________________
A |_|_|_|_|_|_|_|_|
B |_|_|_|_|_|_|_|_|
C |_|_|_|_|_|_|_|_|
D |_|_|_|_|_|_|_|_|
E |_|_|_|_|_|_|_|_|
F |_|_|_|_|_|_|_|_|
G |_|_|_|_|_|_|_|_|
H |_|_|_|_|_|_|_|_|

Rank: Seaman Recruit

Welcome to pewpewboat! We just loaded a pew pew map, start shootin'!

Enter a coordinate:

So this is a Battleship game. Playing manually for a bit, I see the “ships” form up in the shape what looked like a letter. Hmm could this be the flag?

It’s now time to read the code.

Continue reading

Writing Code for the ATtiny10

I previously wrote about the hardware aspects of getting your code into an ATtiny10 some 7 years ago (wow that was realllyy a long time ago!).

Now, avrdude is at version 6.3 and the TPI bitbang implementation has already been integrated in. The upstream avr-gcc (and avr-libc) also have proper support for ATtiny10s now. These software components are bundled with most distributions, including the Arduino IDE, making it easily accessible for anyone. Previously a fully integrated and working toolchain only came from Atmel and it was behind a registration page.

The price of the ATtiny10 has also dropped by a lot. When I first bought this microcontroller in 2010, element14 carried it for $1.85 in single quantities. Now, they are only $0.56 each.

I thought I’d write up a short post about writing and compiling code for it.

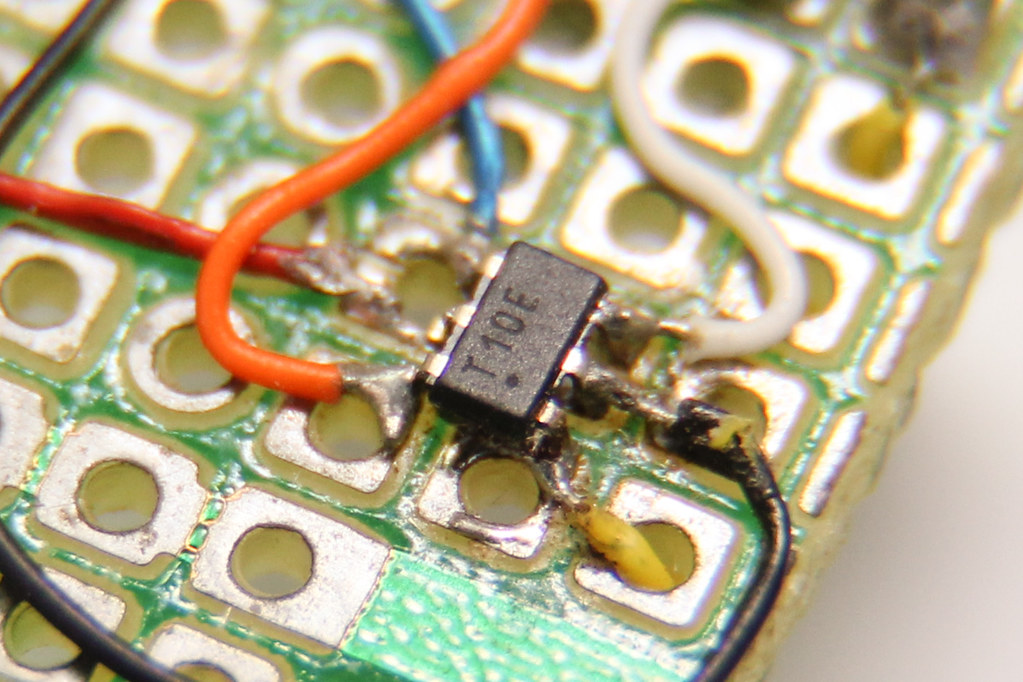
ATtiny10 on a prototyping board

Continue reading

Framework for Writing Flexible Bruteforcers

When writing a bruteforcer, it’s easiest to think of it as mapping some kind of output to a monotonically-increasing number.

Like for one of the solved PlaidCTF question, the answer string was composed from the eight letters “plaidctf”, which conveniently is a power of 2, meaning each output character can be represented with 3 bits. To write a bruteforcer for a string composed of these characters, you might imagine generating a 3-bit number (i.e. from 0 to 7) then mapping it to the character set for one output character, or a 30-bit number if the output string was 10 characters. Unsurprisingly, this was exactly what I did for my solver script. The output string was generated from a BitVector of 171 * 3 bits.

But what if the output was composed of several different pieces that cannot be represented uniformly as a set of bits?

One solution might be to emulate such a behaviour using an array of integers, like how I modified my solver script in version 2 to handle a character set of arbitrary length.

In this post, I will walk-through writing a basic, but flexible, bruteforcer with accompanying code snippets in Go.

Keeping State

Continuing on the CTF puzzle, the BitVector was replaced with an array of Ints. Each Int will represent one character of the output string. We can thus represent the state like so (for simplicity, let’s limit the output string to 2 characters):

type state struct {
    digit [2]int
}

In order to increment each digit, we can write a function that increments state.digit until a certain number, then resets it to zero.

To make it generic, we will write a function that returns another function that manipulates a digit position, so we don’t have to copy & paste the code for each digit position:

// returns a function that manipulates the digit at given pos
func digitManipulator(pos int) func(*state) bool {
    return func(s *state) bool {
        s.digit[pos]++
        if s.digit[pos] == MAX_NUMBER {
            s.digit[pos] = 0
            return true
        }
        return false
    }
}

We will talk more about the boolean return value later.

Continue reading