These days with larger and larger drive capacities, erasing stored data takes longer and longer. Another problem is also the inability to do so when the time comes, due to bad sectors or hardware failures. Just because the data is not accessible by you does not mean that it is also inaccessible to someone else with the know-how.
Cryptographic erasure to the rescue!
Crypto erase simply erases the encryption key that is used to encrypt the data on your drive. This is the primary reason why I encrypt my drives.
Oddly, I have not found anyone talking about BitLocker crypto erasure or doing it. The closest I have seen is manage-bde -forcerecovery, which removes all TPM-related key protectors. This is briefly described in a TechNet article titled BitLocker™ Drive Encryption and Disk Sanitation.
But what if we are not running Windows? What if the disk is not a Windows boot drive that is protected by a TPM key protector?
In order to erase the (key) data, we first need to know how the data is stored on disk. For open-source FDE implementations, this is easy because the disk format is well-documented, but BitLocker is not exactly open.
BitLocker Disk Format
BitLocker was first introduced in Windows Vista and has gone through changes since then. Some changes were made to the format in Windows 7, but has largely remained unchanged through Windows 8 till 10.
For LUKS, it is simple – there is a LUKS header at the start of the disk, followed by the encrypted volume data. For BitLocker, it is slightly more involved, probably due to backward-compatible design considerations.
The header at the start of the partition is a valid boot sector (or boot block), so not all BitLocker information can be stored within. Instead, this volume header points to the FVE metadata block where most of the data is kept. In fact, there are 3 of these for redundancy. This metadata block is what holds all the key material.
The metadata blocks are spaced (almost) evenly apart, located near the start of the volume.
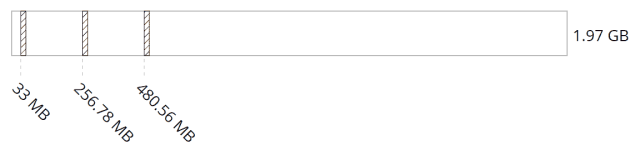
# blwipe -offset 0x2010000 bitlocker-2gb.vhd
metadata offset 0: 0x02100000
metadata offset 1: 0x100c8000
metadata offset 2: 0x1e08f000
metadata block 0 (size 65536): parsed OK
metadata block 1 (size 65536): parsed OK
metadata block 2 (size 65536): parsed OK
The first metadata block usually begins at 0x02100000. This illustration depicts the locations for a 2 GB volume:
If there are 3 of these blocks, how do we know know which ones contain valid data?
The data in these metadata blocks are protected by two types of integrity mechanisms, each serving a different purpose:
- A CRC-32 checksum at the end of the metadata block guards against media corruption
- A cryptographic signature based on this checksum prevents malicious modifications
To remove the cryptographic keys that allow decryption of the volume, data in all 3 blocks must be destroyed.
For our purposes, this disk is one that we wish to erase and thus do not require any cryptographic verification that the metadata blocks have not been tampered with. As a side note, I have not seen any documentation or open-source implementation of such a verification procedure (yet).
These metadata blocks are aligned to the start of a sector (512 bytes) and can be identified by an 8-byte signature “-FVE-FS-“. Note that this string also appears in the volume header after the JMP instruction.
I am providing a small open-source tool called blwipe that can parse these metadata blocks. This tool is straightforward enough to be consulted for the CRC-32 verification. It has also been previously implemented in dislocker, a FUSE-based utility for mounting BitLocker volumes on platforms other than Windows.
blwipe
blwipe can parse and display metadata blocks in a BitLocker volume. Using this information, it can also render the volume un-decryptable by overwriting these blocks (and the volume header).
You have seen one invocation of it above that displays metadata block offsets.
To erase a BitLocker volume, you specify the -wipe flag to tell it to fill the metadata blocks and the volume header with random data.
Lastly, you can also specify -v (for verbose) if you want to see some members of the data structures on disk, although it isn’t really formatted in a very readable fashion.
How Secure is it?
I think the NIST guidelines for Media Sanitization have laid out some good, “common-sense” considerations for using cryptographic erase (CE):
- Do not use CE if encryption was enabled after sensitive data was stored on the device
-
Consider using CE when we know the location(s) on the media where the encryption key is stored and can sanitize those areas … ensuring the actual location on the media where the key is stored is addressed
If you are using some storage media with wear-levelling (e.g. SSD), know that there is no reliable way to target the exact area where the metadata blocks are stored.
Sometimes, Windows may suspend BitLocker on the OS drive for some types of system updates (e.g. BIOS firmware updates). This means that a clear key is written to the metadata block.
If you add these 2 facts together, you run into a scenario where you cannot reliably erase the clear key and therefore, the encrypted data on the disk, thereby allowing unrestricted decryption. This scenario is exactly what someone has asked on Super User before.
My user directory (and important data) is stored on a separate disk, which Windows has no reason to suspend BitLocker on, and it is not an SSD. In this case, it should be a suitable candidate for cryptographic erase.
Sidequest: Going Deeper
Setting aside encryption details, BitLocker is actually quite straightforward.
Unlike other FDE solutions (e.g. TrueCrypt or LUKS) which exposes a subset view of the volume, BitLocker exposes the entire volume to the upper layers. This means that BitLocker volumes show up the same size as the physical volume, instead of a smaller size after accounting for metadata overhead.
It is sector-based and maps almost one-to-one, except for the sectors at the beginning of the volume, because the encrypted volume needs to have a valid boot sector. To make this work, BitLocker saves a copy of the starting sectors (typically 16 sectors) in another location within the volume. When one of the front sectors are requested, the BitLocker driver redirects reads to the location where the sectors were backed up, instead of the actual physical sectors. These backed-up sectors are encrypted the same way, just not stored at the front.
You might then wonder: if the volume is mapped one-to-one and the FVE metadata blocks are among them, then what happens if the file system driver decides to use that metadata area for storing file data?
BitLocker works quite closely with NTFS to prevent this. It gets NTFS to assign those metadata areas to special files under the System Volume Information folder.
We can use dislocker to first decrypt the BitLocker volume, then use NTFS-3G utilities to read the NTFS file system contained within:
# dislocker-fuse --offset $((0x2010000)) bitlocker-2gb.vhd mntpt

# ntfsls -R -l -i mntpt/dislocker-file
/:
     36           0 May  1 01:28 2018 System Volume Information

/System Volume Information:
     36           0 May  1 01:28 2018 .
     45        8192 May  1 01:29 2018 FVE2.{24e6f0ae-6a00-4f73-984b-75ce9942852d}
     42         512 May  1 01:29 2018 FVE2.{aff97bac-a69b-45da-aba1-2cfbce434750}.1
     43         512 May  1 01:29 2018 FVE2.{aff97bac-a69b-45da-aba1-2cfbce434750}.2
     46       65536 May  1 01:29 2018 FVE2.{da392a22-cae0-4f0f-9a30-b8830385d046}
     39       65536 May  1 01:29 2018 FVE2.{e40ad34d-dae9-4bc7-95bd-b16218c10f72}.1
     40       65536 May  1 01:29 2018 FVE2.{e40ad34d-dae9-4bc7-95bd-b16218c10f72}.2
     41       65536 May  1 01:29 2018 FVE2.{e40ad34d-dae9-4bc7-95bd-b16218c10f72}.3
     38          76 May  1 01:28 2018 IndexerVolumeGuid
     37          12 May  1 01:28 2018 WPSettings.dat
Notice that there are several FVE2.{GUID} files. These are files that were created at the start of the BitLocker encryption process and map to the various metadata areas.
Let’s look at these FVE2 files in more detail.
NTFS-3G comes with some nice utilities we can use to query the NTFS structures, like ntfscluster:
# for i in `seq 39 41`; do ntfscluster -I $i mntpt/dislocker-file; done
Dump: /System Volume Information/FVE2.{e40ad34d-dae9-4bc7-95bd-b16218c10f72}.1
    0x10 - resident
    0x30 - resident
    0x80 - non-resident
             VCN     LCN     Length
               0     8448       16
Dump: /System Volume Information/FVE2.{e40ad34d-dae9-4bc7-95bd-b16218c10f72}.2
    0x10 - resident
    0x30 - resident
    0x80 - non-resident
             VCN     LCN     Length
               0    65736       16
Dump: /System Volume Information/FVE2.{e40ad34d-dae9-4bc7-95bd-b16218c10f72}.3
    0x10 - resident
    0x30 - resident
    0x80 - non-resident
             VCN     LCN     Length
               0   123023       16
LCN in this case is the “Logical Cluster Number”, which we can translate into a byte offset if we know how many bytes are there in each cluster. We can find this out using ntfscluster as well:
# ntfscluster mntpt/dislocker-file
bytes per sector        : 512
bytes per cluster       : 4096
sectors per cluster     : 8
bytes per volume        : 2111827968
...
So the offsets for each of these files are:
- 8448 x 4096 = 34,603,008 (
0x2100000) - 65736 x 4096 = 269,254,656 (
0x100C8000) - 123023 x 4096 = 503,902,208 (
0x1E08F000)
If you look back at the previous section, you will see that these hex offsets correspond to the locations of the FVE metadata blocks. The length of these “files” is 16 clusters, or 65,536 bytes, which is coincidentally also the size of each metadata block.
Moving on,
# ntfscluster -I 45 mntpt/dislocker-file
Dump: /System Volume Information/FVE2.{24e6f0ae-6a00-4f73-984b-75ce9942852d}
    0x10 - resident
    0x30 - resident
    0x80 - non-resident
             VCN     LCN     Length
               0     8464        2
This file points to the region at offset 34,668,544 (0x2110000) where the starting sectors were backed up.
You can use dislocker-metadata to show you this information from the unencrypted volume without mounting it:
# dislocker-metadata -o $((0x2010000)) -V bitlocker-2gb.vhd
.
.
[INFO] =======[ Datum n°5 informations ]=======
[INFO] Total datum size: 0x0064 (100) bytes
[INFO] Datum entry type: 15
[INFO] Datum value type: 15
[INFO]    `--> VIRTUALIZATION INFO -- Total size header: 24 -- Nested datum: no
[INFO] Status: 0x1
[INFO] NTFS boot sectors address:  0x2110000
[INFO] Number of backuped bytes: 0x2000 (8192)
[INFO] Unknown:
[INFO] 0x00000000 05 00
[INFO] Size: 0x004c (76)
[INFO] Unknown:
[INFO] 0x00000000 00 00 00 00
[INFO] Flags: 0xb (11)
[INFO] Convert Log offset: 0x0000000000000000
[INFO] Convert Log size:   0x00000000 (0)
[INFO] Sector size (1): 0x200 (512)
[INFO] Sector size (2): 0x200 (512)
[INFO] =========================================
.
.
Apart from being stored in the datums, this backup offset is also stored in the FVE metadata blocks plainly. Those can be inspected by passing -v to blwipe (note the HeaderSectors and HeaderSectorsOffset):
# blwipe -v -offset 0x2010000 bitlocker-2gb.vhd
.
.
metadata block 0 (size 65536):
&{InfoStructHeader:{Signature: ... HeaderSectors:16 InfoOffsets:[34603008 269254656 503902208] HeaderSectorsOffset:34668544}
metadata block 1 (size 65536):
&{InfoStructHeader:{Signature: ... HeaderSectors:16 InfoOffsets:[34603008 269254656 503902208] HeaderSectorsOffset:34668544}
metadata block 2 (size 65536):
&{InfoStructHeader:{Signature: ... HeaderSectors:16 InfoOffsets:[34603008 269254656 503902208] HeaderSectorsOffset:34668544}
By marking these areas as “in use”, the file system driver ensures that they won’t be allocated for use by normal file data.
So far we have only talked about NTFS, but BitLocker also works with FAT and FAT32 volumes, although the data structures on disk varies slightly. Microsft calls this BitLocker-To-Go, and it is meant for encrypting flash drives and external disks which typically use FAT instead of NTFS.
Further Reading
The BitLocker Drive Encryption Technical Overview provides a good technical overview of BitLocker encryption, especially the architecture diagrams.
dislocker is an awesome open-source FUSE filesystem that can mount BitLocker volumes. The source code also serves as some form of documentation when looking at BitLocker structures.
Implementing BitLocker for Forensic Analysis (2009) by Jesse Kornblum was one of the earlier papers on BitLocker.
If you want to follow along at home, Windows actually has the native ability to mount disk images in the VHD & VHDX format since Windows 7. This image format came from Microsoft’s acquisiton of Virtual PC from Connectix.

Loved readingg this thank you