As I have mentioned in the review, the stock firmware on the Xiaomi AX3600 wireless router is extremely limiting. On top of that, the firmware is also locked to install only authorized updates from the manufacturer. If you have been following the blog, you will know that I like the flexibility that ASUSWRT provides for customizing my router.
While there is currently an on-going effort to try and port vanilla OpenWRT for this router, I suspect that might take some time. In this post, I describe how to workaround the lousy firmware and configure the router with the advanced features I need.
Router Disassembly
It is recommended to have UART access handy, in case something bad happens and you need to recover your router, or if you want access to U-Boot, the bootloader. This would require you to crack open your router, so you might only want to do this if necessary. Feel free to skip this section if you are not interested in the hardware, or don’t need low-level access.

You need to unscrew 5 screws, 4 of which are hidden under the rubber feet, and one under the center sticker label. In the disassembled top view photo here, you can see the screw holes at the corners, as well as a missing chunk in the center of the heatsink for the mating screw post, directly aligned with the AIoT antenna and indicator LEDs.
The clips that hold the two halves in place are the trickiest. I tried my best, but still managed to destroy some clips and a few plastic nubs after excessive prying. The clips are located all along the front and back of the case, as well as at the sides (where the two antennas are). If I were to do this again, I’d advise to start from the side clips because they don’t have any other obstructions. The front & back rows have additional plastic nubs that prevent the top cover from being squeezed inwards easily to release the clips, whereas these aren’t present at the sides.
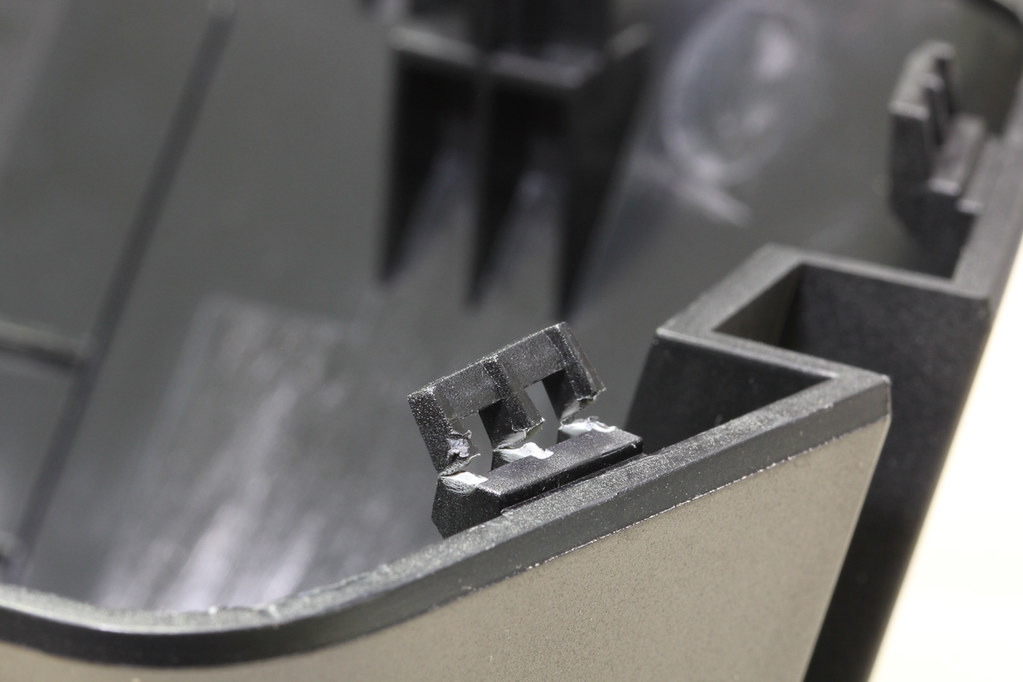
You can check out more disassembly photos in my Flickr album, to hopefully help you avoid the mistakes I made.
Serial Port
The serial header is located at the left side of the board, with the unit facing towards you, antennas behind. I typically don’t like to solder down the header pins, so I taped the serial cable down to the metal plate to try and keep the header pins in place with friction.

They have also helpfully marked the colour of the cables if you are using the typical Chinese UART-to-USB adapter: green, white and black. The serial settings are typical: 115,200 baud, 8N1.
Note that you can only interrupt the boot sequence if you have uart_en=1 and boot_wait=on set in the NVRAM.
Getting a Shell
You need to first get SSH access on the router, which is what some might call “jailbreaking”. This is done using an exploit found by others on the 1.0.17 version. I will not repeat the instructions here, but you essentially need to access a few URLs to
- patch
/etc/init.d/dropbearfor unconditional SSH access - set a root password
- start the dropbear service
Later versions do not seem to have any known exploits. But if we just stick to this old version, we won’t get the benefits of newer versions, like 160MHz bandwidth or improved wireless drivers.
Custom Firmware
While there are people working on porting vanilla OpenWRT to the AX3600, I suspect it would be quite some time before we see a usable port. The firmware is currently based on Qualcomm’s QSDK instead of the main OpenWRT tree, which means there might be proprietary changes and drivers that are not available in the main tree (yet). Unfortunately, this is also something I don’t have time to work on, or assist with. The stop-gap solution I have come up with is firmware modding.
Knowing how the update file is structured, we can extract the firmware, remove the protections, and flash the patched firmware directly.

The update image primarily contains a “root.ubi” portion that is a UBI volume, which has both the kernel and root filesystem in it. Fortunately, the RSA signature on the update image is only verified at the time a new firmware is uploaded and flashed, and not part of a secure boot chain like Android or iOS devices. The kernel portion uses a U-Boot FIT uImage format, which combines the kernel, device-tree blobs and some hashes and settings in a device-tree-like format. The root filesystem is just a squashfs, so it can be unpacked and repacked easily with existing tools.
I wrote a tool called xqrepack, which basically takes the official firmware, dissects it, performs some modifications and puts it back together. The important goal of this modding process is to preserve SSH and UART access, as the official firmware disables them after every upgrade. SSH is crucial to allow direct access to OpenWRT (or Linux) so that we can set up the wireless and Gigabit networking exactly how we want it.
The other task is to remove phone-home functionality from the firmware. In my review, I have mentioned the web UI tracking that is evident by looking at your browser network requests. In the firmware image, I have noticed more logging & collection of statistics on the router, which is routinely uploaded to Xiaomi. If there are any crashes or failed upgrades, these are also reported back to Xiaomi (along with your WiFi configuration settings), which I assume helps them be aware of and fix these problems. Last but not least, using the AIoT functionality of the router also requires interaction with the Xiaomi servers. This has been the case for all of their IoT products anyway. xqrepack will remove all the AIoT functionality and other phone-home mechanisms. Note that in doing so, you will lose AIoT functionality, and also the WAN LED indicator because it pings their servers as a connectivity test. If this is something that you cannot accept, then you should not use this tool, or you can modify the tool yourself.
There has been a few reports of the tool working successfully with the latest version, 1.0.67 at this time of writing, including myself. If you encounter any problems, please feel free to file issues (or pull requests) on the GitHub project.
Once you have a modified firmware image, you can flash this onto your router, using the SSH access obtained in the previous section.
Now, you have a wireless router with updated drivers and firmware, which you can customize beyond what Xiaomi has allowed.
Advanced Wireless Features
For my networking requirements, I need a VLAN segregated guest network, and I also use WPA Enterprise on my network.
Digging into the firmware, Xiaomi has relied on QSDK from Qualcomm to base their firmware on. Internally, it uses hostapd for creating the wireless APs, which means it is quite flexible, and is invokved in such a way that respects the OpenWRT UCI config. Because this firmware uses a dumbed down web UI, we will have to directly edit the OpenWRT config files to achieve what we need.
WPA Enterprise
The wireless AP settings are stored in /etc/config/wireless. An existing AP entry looks like this:
config wifi-iface
    option device 'wifi0'
    option ifname 'wl0'
    ...
    option encryption 'psk2+ccmp'
    option sae '1'
    option sae_password 'mywifipassword'
    option key 'mywifipassword'
    option ieee80211w '1'
    option ssid 'Xiaomi_1234`
The important parameter here is encryption. You can find the full list of “WPA Modes” in the OpenWRT guide here. Anything that is psk* or sae uses a pre-shared key.
In order to use WPA Enterprise, the “encryption” setting needs to be wpa*. If you have only modern devices and don’t have legacy devices trying to connect, you can go ahead and use wpa3 or wpa3-mixed for WPA2/3 Enterprise mode. Otherwise, a good option might be wpa2+ccmp.
You will also need to specify the RADIUS server settings with auth_server and auth_secret. You don’t need to specify the auth_port unless it’s not 1812. Verify that the hostapd file generated at /var/run/hostapd-wl*.conf is correct.
A modified section should look like this:
config wifi-iface
    ...
    option encryption 'wpa2+ccmp'
    option ssid 'Xiaomi_1234'
    option auth_server '192.168.0.1'
    option auth_secret 'testing123'
VLAN Segregated Guest Network
I typically have a guest SSID set up; this is easy to do on a more “advanced” router. In addition, I also want traffic to/from this guest AP to be separated out into its own VLAN.
You will need to create the guest APs (or wireless interfaces) by copying and pasting the current sections from /etc/config/wireless.
There are 3 wifi-devices: wifi0, wifi1 and wifi2. wifi0 and wifi1 correspond to the 5GHz and 2.4GHz radios for the router, and wifi2 (as I speculated in the review) is the 2.4GHz radio for AIoT.
config wifi-device 'wifi0'
    option type 'qcawificfg80211'
    option macaddr '88:c3:97:aa:bb:cc'
    option hwmode '11axa'
    ...
Depending on which radio you want your AP to be on, use the appropriate wifiX device.
After the initial router setup, there should have been 2 wifi-ifaces created by default, one for each band or wifi-device, called wl0 and wl1:
config wifi-iface
    option device 'wifi0'
    option ifname 'wl0'
    option network 'lan'
    option mode 'ap'
    option wpsdevicename 'XiaoMiRouter'
    option ssid 'Xiaomi_1234'
    ...
You will need to duplicate the wl0 and wl1 interfaces to create your own virtual APs. Note that the interface names cannot have dots, so I have named them wl01 and wl11 (a 1 suffix). You can set a different PSK for the virtual APs here or have them use different authentication mechanisms, like WPA Enterprise which I have mentioned.
To put them on a separate guest network, create a “guest” bridge by adding an entry in /etc/config/network. There should already be a “lan” interface section, which is where the LAN ports eth2, eth3 and eth4 are currently placed.
This section creates a bridge called br-guest and places VLAN 10 of all LAN ports into it:
config interface 'guest'
    option proto 'static'
    option ifname 'eth2.10 eth3.10 eth4.10'
    option type 'bridge'
The interfaces listed in option ifname will be created automatically. Make sure the wifi-iface section also specifies option network 'guest' in order for the guest APs to be placed in the same VLAN 10 network.
After you have updated the settings, you can use the wifi reload command to re-configure the network devices, or you can just reboot. To verify that the correct settings have been applied, use brctl show:
root@XiaoQiang:~# brctl show
bridge name   bridge id           STP enabled   interfaces
br-guest      7fff.88c300aabbcc   no            eth2.10
                                                eth3.10
                                                eth4.10
                                                wl01
                                                wl11

br-lan        7fff.88c300aabbcc   no            eth2
                                                eth3
                                                eth4
                                                wl0
                                                wl1
Now, wireless clients that join those APs will be placed on this “guest” network on a separate VLAN. Wireless clients that join the main wl0 and wl1 network will go out over the LAN ports as normal, untagged.
VLAN Caveat
One odd thing I noticed with this setup is that DHCP, DNS and ping requests can get through, but HTTP downloads do not work. Running tcpdump on both the server and the wireless router, I noticed that larger packets of the HTTP traffic did not make it through to the router. The main network did not exhibit this problem though.
I soon realized the problem was related to MTU size. While debugging the VLAN config, this swconfig output caught my eye:
root@XiaoQiang:~# swconfig dev switch0 show
Global attributes:
    enable_vlan: 1
    max_frame_size: 1518
    dump_arl: MAC: 00:0d:bb:aa:bb:cc PORTMAP: 0x08 VID: 0x9 STATUS: 0x0
    ...
The maximum frame size accepted by the switch was 1518, a typical 1500 MTU size plus Ethernet overhead. However, note that encapsulating traffic in a 802.1Q VLAN would add a 4-byte tag, causing the length to increase beyond the size of a typical Ethernet frame.
One easy way to fix this was to set the MTU on the server's interface lower. The default MTU is 1500, so we need to reduce this by 4 to accomodate the VLAN tag:
ip link set dev eth0 mtu 1496
After this, all traffic could pass through the guest network properly, thereby confirming this hypothesis. This would be a hassle if there were multiple devices plugged in to the router that needed to communicate with wireless guests.
I tried doing the reverse, to make the router accomodate larger MTUs:
root@XiaoQiang:~# swconfig dev switch0 get max_frame_size
1518

root@XiaoQiang:~# swconfig dev switch0 set max_frame_size 1528
failed
I noticed that the system scripts also used ssdk_sh to set parameters for the switch, so let’s try that:
dev0@qca>misc frameMaxSize get

This request is not support

dev0@qca>misc frameMaxSize set 1528

This request is not support
I am afraid the frame size is either hardcoded in the drivers somewhere, or worse, in the hardware. This also means that jumbo frames are not supported.
Indicator LEDs
Some routers allow you to turn off the LEDs to be more disceet, or to not be disturbed at night. The AX3600 indicator lights are quite tame, compared to other devices, but in a dark room it can still be distracting. You may also want to re-purpose the indicator lights for your own use.
The good news is that all the LEDs are available in sysfs:
led_blue/led_yellowfor the SYSTEM indicatornet_blue/net_yellowfor the INTERNET indicatorled_anton the AIoT antenna indicator
I wrote a toy script to sequence the LEDs, just for fun.
Conclusion
As I mentioned in the review, this is really good router hardware for the price (US$100). You get a 802.11ax router with 4×4 MIMO configuration, 2×2 MIMO for the 2.4GHz band, and an extra 2.4GHz radio for AIoT which you can re-purpose, all powered by a 64-bit quad-core ARM CPU. And now that I realized that you can easily customize the network settings without jumping through too many hoops, it’s an even better value (for me, at least).
You can find the xqrepack tool to repack the firmware on GitHub here, together with some instructions on how to use it. You can also check out the OpenWRT documentation for more resources on how to configure the OS in general — it was a great help to me.
I will still need to assess the long-term stability of the router though, to see if the drivers lock up over time, or stop accepting clients, or stop routing traffic, etc.

global version is available on aliexpress
https://aliexpress.com/item/1005001346449211.html
is it possible to extract/get firmware url without ssh access ?
If you know how, you can probably extract the URL from the firmware. The official firmware can be downloaded from miwifi.com. You’ll probably need to translate the page if you don’t read Chinese. These steps can be performed without the hardware, and hence also without SSH access.
i have firmware version 1.0.227 some other people have 1.0.67 and only that firmware is available on mifi site i tried to url sniffer but no firmware url
If you are looking for URLs for older versions of the firmware, you can try searching on forums. The old firmware URLs are still active.
lovely writeup.
API for checking FW is available, but is protected,&s= or &token= is the checksum maybe you know how to calculate that?
http://eu.api.miwifi.com/rs/grayupgrade?countryCode=PT&rom=3.0.16&serialNumber=&ispCode=&linux=4.4.16&sqafs=0.0.1&hardware=R3600&locale=en_US&ramfs=0.0.1&channel=release&s=cfcb3672b30cd08b0aad5a51e49f26f7&time=2020-09-15–15:11:57&token=8007236f-a2d6-4847-ac83-c49395ad6d65
Sorry I have no idea how to calculate this.
1.0.227 chinese firmware download:
http://cdn.cnbj1.fds.api.mi-img.com/xiaoqiang/rom/r3600/miwifi_r3600_firmware_71e96_1.0.227.bin
International firmware here: http://cdn.awsde0-fusion.fds.api.mi-img.com/xiaoqiang/rom/r3600/miwifi_r3600_all_6510e_3.0.22_INT.bin
Hello. I need ssh access to redmi ax6 and I wonder, how to flash it with custom firmware made from r3600. When i try to flash ax6 with r3600 firmware i get signature verification error. How to cook image from r3600 source for ax6?
I do not know how similar the AX6 hardware is to the R3600, but I do not recommend you flash the other model’s firmware onto it. I haven’t looked at the AX6, but I do know that someone has tried using this tool for the AX5 and it works.
For ax5, ax1800 and ax3600 this method works, for ax6 not. ax6 and ax3600 hardware quite similar, only diffrence is additional iot wifi module QCA9889 in ax3600 and 128MB flash in ax6.
Please, someone can dump the /etc/config/wireless , in some update, the file was erased and now i cannot access the wifi part of the web console
Do you know what does messaging do in the router? The messaging file is located in /etc/config/.
If I remember correctly, it has something to do with the Xiaomi IoT ecosystem.
Great article. I am trying to figure out how to do local domains. On my old router I used “.lan” as the local domain, and I could reach my NAS by visiting “nas.lan”. With this router there is no setting, and I have enabled SSH and kept looking for ways to enable this.
I tried using SSH to go to /etc/config/dhcp and adding this setting:
option domain ‘lan’
But it is not working.
Also tried editing the device itself:
config host ‘xxxxxxxxxx’
option mac ‘xx:xx:xx:xx:xx’
option name ‘nas’
option domain ‘nas.lan’
option ip ‘192.168.1.2’
You might want to take a look at some DNS & DHCP configuration examples for OpenWrt: https://openwrt.org/docs/guide-user/base-system/dhcp_configuration
I managed to get it working. But for some reason I cannot get port forwarding working. I have tried via the web ui and also by editing /etc/config/firewall without any success
I have ssh access to my AX3600.
Is possible to add OPENVPN protocol to the router’s VPN options???
I use NordVPN and they do not support PPTP and L2TP, the only protocols available on the router. Appreciate any help. Thanks!!
I would be interested in this as well
Thanks for the guide!
About switch maximum frame size, it seems to be driver issue and fixed in
https://github.com/torvalds/linux/commit/f58d2598cf70d41f73e761b62a114d2e8f94a676
Interesting, although I doubt think we will see this fix anytime soon in the official firmware. I will see if there is some interim solution. Thanks for sharing!
This is a great tutorial and I’ve been running a modified firmware since unboxing the router!
I now have reason to set up a VLAN. I didn’t quite understand the issue and resolution. Do guests have no HTTP success at all (i.e. cannot use the internet). And the only solution seems to be to change settings on the guest device itself? Or on the server that the guest device ID trying to access?
This issue seems to only affect devices physically connected to the router, so if you have wireless cameras on a guest VLAN and they talk amongst themselves then that’s fine. But if you wire up a PC that wants to talk to the cameras on this guest VLAN, then the PC must reduce its MTU to 1496. The problem arises when a wired device wants to participate in VLANs on this router. I hope that explains the situation better.
Hey Darell,
an incredibly interesting article even if I only understood 10%…
In the meantime I bought the Xiaomi AX6000 with Chinese firmware & language and am now (desperately) looking for a way to use a custom firmware, or a modified version.
Do you see any chance that you will deal with this!?
Thanks, greetings & excuse my bad English.
Superblond
If it’s anything like the AX3600, then maybe Xiaomi will release an “international version” subsequently (although that doesn’t help with custom firmware, just the UI language). As for custom firmware, I don’t think anyone has found an exploit yet. We can do this for the AX3600 because there was an exploit in an older firmware version, which was used to gain access first. Once we get access, we can flash a custom firmware onto the router. I think it’s a matter of time before someone finds a way for the AX6000, or maybe it could be flashed through hardware means.
Hi darell! How are you doing?
I messed up my AX3600 and I think you may be able to help me. Here’s the story:
I flashed the QSDK OpenWRT build following the instructions here: https://www.right.com.cn/forum/thread-4040158-1-1.html
Then, messing up with configs in OpenWRT I ended up soft bricking the device. Then I had the genius idea of flashing back Xiaomi firmware by using MIWIFIRepairTool.x86, I was able to flash the firmware but then after reboot I end up in a reboot loop. Good thing is, I have working serial access to it. But I have 0 experience with u-boot so I’m kinda lost in what I should do. Can you help me recover it?
This is the boot log that I see in console log:
Format: Log Type – Time(microsec) – Message – Optional Info
Log Type: B – Since Boot(Power On Reset), D – Delta, S – Statistic
S – QC_IMAGE_VERSION_STRING=BOOT.BF.3.3.1-00147
S – IMAGE_VARIANT_STRING=HAACANAAA
S – OEM_IMAGE_VERSION_STRING=xiaoyang-gv
S – Boot Config, 0x000002e5
B – 201 – PBL, Start
B – 2739 – bootable_media_detect_entry, Start
B – 3445 – bootable_media_detect_success, Start
B – 3450 – elf_loader_entry, Start
B – 6113 – auth_hash_seg_entry, Start
B – 6356 – auth_hash_seg_exit, Start
B – 68487 – elf_segs_hash_verify_entry, Start
B – 131187 – PBL, End
B – 215604 – SBL1, Start
B – 294996 – GCC [RstStat:0x10, RstDbg:0x600000] WDog Stat : 0x4
B – 304756 – pm_device_init, Start
B – 484950 – PM_SET_VAL:Skip
D – 178181 – pm_device_init, Delta
B – 487237 – pm_driver_init, Start
D – 5368 – pm_driver_init, Delta
B – 493673 – clock_init, Start
D – 2165 – clock_init, Delta
B – 497729 – boot_flash_init, Start
D – 11895 – boot_flash_init, Delta
B – 513315 – boot_config_data_table_init, Start
D – 3202 – boot_config_data_table_init, Delta – (575 Bytes)
B – 520818 – Boot Setting : 0x00000600
B – 524752 – CDT version:2,Platform ID:8,Major ID:1,Minor ID:0,Subtype:16
B – 531706 – sbl1_ddr_set_params, Start
B – 535519 – CPR configuration: 0x300
B – 538904 – cpr_init, Start
B – 541771 – Rail:0 Mode: 5 Voltage: 800000
B – 546926 – CL CPR settled at 752000mV
B – 549762 – Rail:1 Mode: 5 Voltage: 880000
B – 553941 – Rail:1 Mode: 7 Voltage: 912000
D – 16470 – cpr_init, Delta
B – 560834 – Pre_DDR_clock_init, Start
B – 564860 – Pre_DDR_clock_init, End
B – 568245 – DDR Type : PCDDR3
B – 573857 – do ddr sanity test, Start
D – 1067 – do ddr sanity test, Delta
B – 578707 – DDR: Start of HAL DDR Boot Training
B – 583343 – DDR: End of HAL DDR Boot Training
B – 589138 – DDR: Checksum to be stored on flash is 571032052
B – 599355 – Image Load, Start
D – 224084 – QSEE Image Loaded, Delta – (1373936 Bytes)
B – 823500 – Image Load, Start
D – 61 – SEC Image Loaded, Delta – (0 Bytes)
B – 831186 – Image Load, Start
D – 10705 – DEVCFG Image Loaded, Delta – (26004 Bytes)
B – 841983 – Image Load, Start
D – 25254 – RPM Image Loaded, Delta – (105964 Bytes)
B – 867328 – Image Load, Start
D – 96502 – APPSBL Image Loaded, Delta – (589900 Bytes)
B – 963952 – QSEE Execution, Start
D – 91 – QSEE Execution, Delta
B – 969747 – USB D+ check, Start
D – 0 – USB D+ check, Delta
B – 976152 – SBL1, End
D – 762836 – SBL1, Delta
S – Flash Throughput, 6754 KB/s (2096379 Bytes, 310363 us)
S – DDR Frequency, 466 MHz
S – Core 0 Frequency, 800 MHz
U-Boot 2016.01 (Sep 28 2020 – 09:05:55 +0000), Build: jenkins-common_router_openwrt_ota_publish-383
DRAM: smem ram ptable found: ver: 1 len: 4
512 MiB
NAND: ONFI device found
ID = 1590aac8
Vendor = c8
Device = aa
qpic_nand: changing oobsize to 64 from 128 bytes
SF: Unsupported flash IDs: manuf ff, jedec ffff, ext_jedec ffff
ipq_spi: SPI Flash not found (bus/cs/speed/mode) = (0/0/48000000/0)
256 MiB
MMC: sdhci: Node Not found, skipping initialization
PCI1 is not defined in the device tree
In: serial@78B3000
Out: serial@78B3000
Err: serial@78B3000
machid: 8010010
MMC Device 0 not found
eth5 MAC Address from ART is not valid
write phy_id=1, reg(0x8074):0x0670
write phy_id=2, reg(0x8074):0x0670
write phy_id=3, reg(0x8074):0x0670
write phy_id=4, reg(0x8074):0x0670
bootwait is on, bootdelay=5
Hit any key to stop autoboot: 0
restore_defaults is set, enlarge xqup detect time
trigger button release!
boot from rootfs 1
miwifi: check crash in rmem bi0: attaching mtd1UBI init error 22
Erasing ▒▒at 0x680000 — 25% ▒▒at 0x6a0000 — 50% ▒▒at 0x6c0000 — 75% Z▒at 0x6e0000 — 100% complete.
Writing toresetting …
>> Then it reboots over and over with this same error
Ok I managed to fix it by using u-boot from serial connection and writing a xiaomi ubi into rootfs_1 with nand write command
For doing it I needed to first boot a uImage with tftpboot and use it to format rootfs_1 with ubiformat tool
That’s great! Sorry I couldn’t be of much help because I haven’t encountered this before. I thought the failsafe mechanism would have kicked in and it would have tried to boot the backup partition.
Hello! Write in detail how you restore the router?
Followed your instructions on setting up a guest WiFi with VLAN. But DHCP is not working on Guest WiFi. I am using 3.0.22 INT firmware (with permanent SSH). I think DHCP is only working on lan bridge but not the guest bridge.
FIgured it out – following this https://openwrt.org/docs/guide-user/network/wifi/guestwifi/guest-wlan
But now my guest devices look like Ethernet cable connected devices on web UI. When I used Mi WiFi to configure guest WiFi, guest devices appear as a separate group in web UI. For some reason after patching bdata, mi WiFi app is not working, always saying router is offline. Hence I configured guest network following your article (though I have to configure dhcp and firewall, else no dhcp or internet connection for guest devices).
Anyone configured guest WiFi via mi WiFi app that is willing to share /etc/config/wireless, /etc/config/network, /etc/config/dhcp, /etc/config/firewall? You can strip out the wifi ssid and password in the wireless file.
Hi Darell,
Thanks for the pics and comments about getting the casing open.
I’m no geek. But I enjoyed reading the whole post and the whole thread.
Reminded me of the good old days when groups were trying to outdo each other in finding exploits to unlock early model locked iPhones.
As for me, I just transported a 3600 half way around the world and an antenna cable came loose. my skill is limited to resoldering it back on.
Thanks for the help. Super-appreciated.
Hi Hans, I’m glad you found it useful! Come to think of it, having no tape or hot glue to hold the antenna connectors securely in place seems like an oversight, especially since it came loose for you during shipping.
Hi, I’m thinking about buying an AX3600 but have a question. Even with these mods, can I still use the mesh functionality?
The mesh functionality shouldn’t be affected by the mods
HI, I’ve two ax3600 connected by mesh. Everything goes well, but can’t see the guest wifi replicated on the second router. Is it normal?? How replicate the guest wifi??
Sorry I don’t use the mesh function, so I have no idea what could be wrong. I am also not sure if guest networks are even replicated across the routers.
Bad news.
The Guest network is only on the main router.
So this makes this Mesh network useless
Hi, great article here! I have 3 AX1800 that act as dumb APs, connected via wire to a central router with OpenWRT that serves all the routing functions and the DHCP. I separated the traffic in different VLANS (VLAN 1 and VLAN 3) one for regular trffic and one for guests. The problem is that if a client connects to the guest SSID, it does not get an IP address unless I create a dedicated DHCP for the guest network on each dumb AP (which I do not, as there is the main router doing DHCP). If I add the dhcp config on each dumb AP, the guests client can connect, but I cannot get to the internet. I have exactly the same set up on another Xiaomi 4A OpenWRT dumb AP and it works flawlessly. I suspect it might have to do with the port allocations on AX1800 and switch config, as I believe haven’t figured out the ports and interfaces correctly. Would you be able to help me out? Thanks
What I added to the config. Everything else
network:
config interface ‘guest_lan’
option proto ‘none’
option type ‘bridge’
option ifname ‘eth4.3’
option stp ‘1’
config switch
option name ‘switch0’
option reset ‘1’
option enable_vlan ‘1’
config switch_vlan
option device ‘switch0’
option vlan ‘1’
option vid ‘1’
option ports ‘2 3 4 5t’
config switch_vlan
option device ‘switch0’
option vlan ‘2’
option ports ‘5t 7t’
option vid ‘3’
wireless:
config wifi-iface
option device ‘wifi1’
option ifname ‘wl10’
option network ‘guest_lan’
option mode ‘ap’
option wpsdevicename ‘XiaoMiRouter’
option intop ‘1’
option macfilter ‘disabled’
option ssid ‘Guest_SSID’
option key ‘secure_password1234’
option disabled ‘0’
option encryption ‘psk2’
option hidden ‘0’
option bss_transition ‘1’
option ieee80211k ‘1’
option ieee80211v ‘1’
option ap_isolate ‘0’
option maxsta ’20’
GeoJ, did you find a way of doing this?
Hi great post, I wonder if you’ve ever used this device in a IPTV setup where the ISP requires a specif vlan.
I.E. my ISP requires “vlan105” and my plan it to dedicate one port for that and pass it over to the IPTV box, my ohter 2 ports are connected to switches so It should be fine, but I’m not sure how to do the config because the wan port also needs to have the vlan
Also for internet they also use vlan 100, so I should be tagging vlan105 on the “cpu port” and the port I want to use.
In a ASUS router I was doing this like:
robocfg vlan 1 ports “1 2 3 8t”
robocfg vlan 100 ports “0t 4t 8t”
robocfg vlan 105 ports “0t 4t 8t”
8 (wan) 0 = cpu
But I’m not sure how to achive this with etc/config/network in wrt
I’ve not used the Xiaomi for this scenario, but it should be achievable by following the same instructions as the “guest” network above. Assuming eth0 is the WAN and eth1 is the TV port, you can put eth0.105 and eth1 in the same “tv” bridge network. You can probably find more examples in the OpenWRT documentation.
TV would be port 2
config interface ‘iptv’
option proto ‘static’
option ifname ‘eth2.105’
option type ‘bridge’
I tried this but It did not work, I believe its because I’m missing the tag part, because in wan both 105 and 100 would need to be tagged “0t” is wan in the aus setup.
I was tried to be “clever” and do it like: ” option ifname ‘eth2.105t’ but this is probably not supported with implicitly notation, I will to take a read at the docs, thanks for the assist
Thanks so much for this.
I do have a question. I want to use this router with my pFsense router/firewall.
So I only want it to be a managed switch.
I’ve manage to create all wifis with correspondent vlans.
My problem is to set up the network config file. I’ve tried many ways to but with no luck.
I want to use port 1(wan) and 4 as trunk port for vlans 10, 20, 30, 40, 50
Then port 2 and 3 will be untagged on port 20
my pFsense router/firewall is the DHCP server.
Once I try to do this, I loose connection to the router. I can only see the wifis but can’t get an IP. So my network file is wrong.
Also, I try using wifi2 to create an wifi e.g. mylan_iot but it gives an error and can’t start it.
Hi Joni, as I mentioned in the post, it’s likely to do with MTU sizes. If you can control the sender end (like your pfSense), try reducing the MTU size to 1496 and see if that works. The 801.2Q header consumes an extra 4 bytes, which chokes at the AX3600 switch, it seems.
Would you be able to help me setting the vlans as an example.
I was trying like:
config switch
option name ‘switch0’
option reset ‘1’
option enable_vlan ‘1’
config switch_vlan
option device ‘switch0’
option vlan ‘1’
option vid ’10’
option ports ‘1t 4t’
config switch_vlan
option device ‘switch0’
option vlan ‘2’
option vid ’20’
option ports ‘1t 2 3 4t’
config interface ‘VLAN20’
option ifname ‘eth0 eth0.20’
option force_link ‘1’
option type ‘bridge’
option proto ‘static’
option ipaddr ‘10.10.0.1’
option netmask ‘255.255.255.0’
option delegate ‘0’
option gateway ‘10.10.0.254’
option multicast_querier ‘0’
option igmp_snooping ‘0’
option macaddr ‘——–‘
option ieee1905managed ‘1’
config interface ‘VLAN10’
option proto ‘none’
option ifname ‘eth0 eth0.10’
option type ‘bridge’
option delegate ‘0’
option force_link ‘1’
Also tried like this:
config device
option name ‘brlan’
option type ‘bridge’
list ports ‘eth1’
list ports ‘eth2’
list ports ‘eth3’
list ports ‘eth4’
option bridge_empty ‘1’
config bridge-vlan
option device ‘brlan’
option vlan ’10’
list ports ‘eth1:t’
list ports ‘eth4:t’
config bridge-vlan
option device ‘brlan’
option vlan ’20’
list ports ‘eth1:t’
list ports ‘eth2’
list ports ‘eth3’
list ports ‘eth4:t’
config interface ‘vlan20’
option device ‘brlan.20’
option proto ‘static’
option ipaddr ‘10.10.0.1’
option netmask ‘255.255.255.0’
config interface ‘vlan10’
option device ‘brlan.10’
option proto ‘none’
I can surely set the MTU, I will give it a shot. just making sure I’m setting up the VLANs the right way. thanks for the help
Just one more hint, i’m setting this router apart from everything else. So not connected to anything just my laptop. and that doesn’t work either. how would I set a lower MTU in my laptop? is that even possible?
Hi there!
First of all, thank you for documenting this useful post for posterity.
As you may already know, there is currently significant development for this device, including NSS compatibility with OpenWrt sources. While I am still waiting to receive my unit, I am investigating the ‘possibility/plausability’ of a hardware mod as adding USB ports (2.0/3.0) to this hardware.
In an ideal scenario (given that the chipset is capable of handling USB) there might be unused pads/traces on the PCB that could be repurposed for standard USB channels with no madness-modification. Within this same ideal scenario, software/driver compatibility should be straightforward due to the Linux kernel /USB kmods also in OpenWrt.
With that in mind, I am trying to gather as much information as possible regarding the PCB, schematics, IC parts lists ….
But, since this device wasn’t released in the US, the typical FCC documentation is not available. Therefore, my question is straightforward:
Based on your experience with this device and what you documented regarding the PCB back then, to what extent… do you think a hardware mod like this would be feasible?
Thank you in advance.Alexander
Hi Alexander, I didn’t examine the PCB too closely, so I’m unsure whether a USB port can be easily bodged on. The PCB was mostly covered by a heat spreader.
Honestly, besides the SMD microsoldering itself and the headache that comes with it (I reckon getting functional USB 3.0 would need nine wires plus two missing components, whereas USB 2.0 only needs two in that area…) …. what worries me most are those massive heatsinks.
It’ll be a pain testing things with a multimeter while the router’s on without them, not to mention trying to route the wires “squashed” underneath.
My unit arrives next week, so I’ll get stuck in then.
I’ve also dug up a post from the OpenWRT forums where someone asked about this a few years back, just in case anyone else is interested.
Thanks!