In case you haven’t heard, the Raspberry Pi Zero is the smallest, most low-cost device in the Raspberry Pi family, but it’s also the hardest to find. It has two Micro-B USB ports, one for power and another functions as a dual-role USB OTG port.
One of the more interesting uses for the Raspberry Pi Zero is to get it to behave as a USB device, just like your USB flash drive, for example.
There have been several guides written already, such as the Adafruit one, but most of them were based on the old kernel gadget drivers, like g_serial and g_ether. It still works, but not as flexible and likely to be deprecated in future.
Newer guides like this one on iSticktoit and another one by Andrew Nicolaou explain how to use ConfigFS to create various type of gadgets. The same approach is used to setup the USB Armory, which was designed to be a USB device stick.
What’s with all this FS?
A short history on USB gadget support in the Linux kernel:
- 2003: USB gadget framework: monolithic kernel modules like g_ether
- 2003: GadgetFS
- 2008: composite framework: multi-function (composite) gadget drivers
- 2010: FunctionFS
- 2013: ConfigFS for USB gadgets ⇽ we are here
For a better introduction of the USB gadgets history, refer to Matt Porter’s presentation on “Kernel USB Gadget Configfs Interface”.
ConfigFS is a pseudo filesystem, not unlike procfs and sysfs, that allows for userspace to create and configure kernel objects. The USB gadget framework decided to make use of ConfigFS to allow gadgets to be created and composed from userspace.
The USB gadget framework has evolved a fair bit since its inception. I would think its due to contributions from Android device manufacturers, since that’s a common use case for Android phones & tablets. These devices primarily act as USB devices when plugged in, to provide functions such as MTP, PTP and ADB to the host computer.
Setting it Up
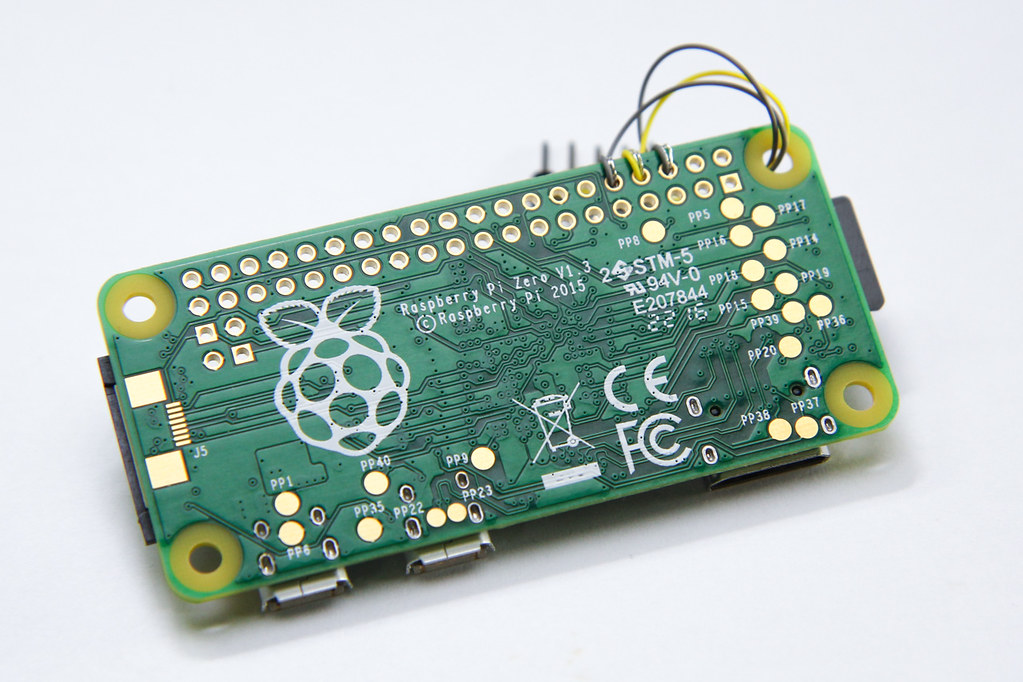
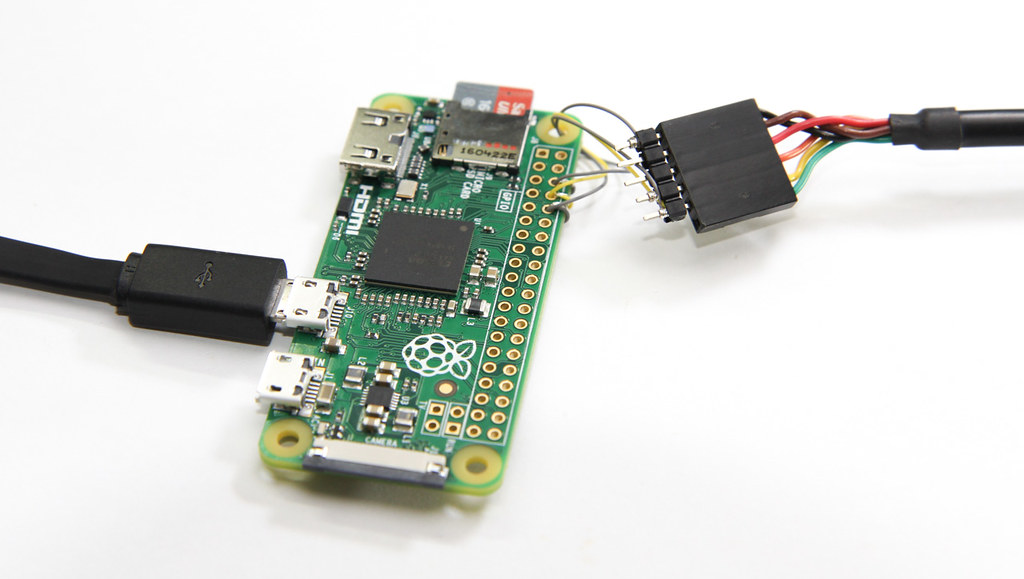
You can do all of this without a serial cable, but having one really helps because it’s a low-level (and bi-directional) means of communicating with the Pi Zero. Here, I’ve wired up the UART pins to connect to an FTDI serial cable. This is what I used to get a shell on the Pi Zero for debugging before I got the USB gadgets working.
Remember that the serial voltage levels must be 3.3V instead of 5V. You don’t want to fry your Pi.
We want the Pi Zero to enumerate as a USB device with (at least) 2 functions:
- Serial port, so we don’t need to use the GPIO headers
- Network “Ethernet” device, so we can update the OS conveniently
The way to do this has been described so many times in various guides, so I’ll just go through this quickly. For more details, you can refer to the new ConfigFS style guides mentioned above.
Basically you need to…
- load the
dwc2device tree overlay by editingconfig.txt, - load the
libcompositekernel module, - create a script that sets up the USB gadgets via ConfigFS,
- start that script at boot up using a systemd unit file.
With a very minimal script such as the one below, placed in /usr/bin/myusbgadget, a composite USB gadget can be created to our specifications:
#!/bin/bash -e

modprobe libcomposite

cd /sys/kernel/config/usb_gadget/
mkdir g && cd g

echo 0x1d6b > idVendor  # Linux Foundation
echo 0x0104 > idProduct # Multifunction Composite Gadget
echo 0x0100 > bcdDevice # v1.0.0
echo 0x0200 > bcdUSB    # USB 2.0

mkdir -p strings/0x409
echo "deadbeef00115599" > strings/0x409/serialnumber
echo "irq5 labs"        > strings/0x409/manufacturer
echo "Pi Zero Gadget"   > strings/0x409/product

mkdir -p functions/acm.usb0    # serial
mkdir -p functions/rndis.usb0  # network

mkdir -p configs/c.1
echo 250 > configs/c.1/MaxPower
ln -s functions/rndis.usb0 configs/c.1/
ln -s functions/acm.usb0   configs/c.1/

udevadm settle -t 5 || :
ls /sys/class/udc/ > UDC
This gadget configuration will create a network interface, usually called usb0, where 0 is a sequential number. You will then need to configure that device separately, but that’s left as an exercise for the reader. Similarly, the serial port will be named ttyGS0 and you will also need to configure a getty to start on it.
Create a systemd service unit for the USB gadget script and use systemctl enable myusbgadget to automatically start it on boot:
# /usr/lib/systemd/system/myusbgadget.service

[Unit]
Description=My USB gadget
After=systemd-modules-load.service

[Service]
Type=oneshot
RemainAfterExit=yes
ExecStart=/usr/bin/myusbgadget

[Install]
WantedBy=sysinit.target
This configuration works fine without any additional driver installation on Linux and Mac OS X (or macOS), but not Windows.
The difficult part is getting it to work seamlessly in Windows (because Windows is really picky).
Making it Work on Windows
Composite USB devices with multiple functions need to indicate this to Windows by using a special class & protocol code. This can be solved easily enough by setting the values in the correct ConfigFS “files”:
echo 0xEF > bDeviceClass
echo 0x02 > bDeviceSubClass
echo 0x01 > bDeviceProtocol
The document also goes on to mention…
These code values also alert versions of Windows that do not support IADs to install a special-purpose bus driver that correctly enumerates the device. Without these codes in the device descriptor, the system might fail to enumerate the device, or the device might not work properly.
The Linux gadgets already have interface association descriptors (IADs) for some devices since a few years ago, such as the RNDIS gadget and the ECM gadget, so we don’t need to worry about that.
If you plug in your Pi Zero USB gadget into a Windows machine, you will notice that it cannot find the drivers for the device, and it also misidentifies the device as a CDC Serial device. This situation has been described quite accurately by user @dlech in a Microsoft Windows 10 forum:
First, some more insight: The Linux rndis gadget function has USB class of 2 and subclass of 2, which matches
"USB\Class_02&SubClass_02"in theusbser.inffile. This is why for some people, their device is initially detected as a COM port instead of RNDIS.
He also proposes a few ways to work around this problem. Solution 2 seemed to be the least intrusive and thus easiest to implement:
Solution 2: If you have control over the RNDIS device and it runs Linux (i.e. BeagleBone), you can tweak the driver to get along with Windows better. For example, if you have a 3.16 kernel or newer, you can setup your gadget using configfs and include os descriptors. […] The key was specifying the compatible and subcompatible ids so that it matches
"USB\MS_COMP_RNDIS&MS_SUBCOMP_5162001"inrndiscmp.inf. This causes the Microsoft RNDIS 6.0 driver to be installed for this device.
Fortunately for us, Microsoft has implemented some proprietary extensions to USB called Microsoft OS Descriptors. This is the mechanism that is used to convince Windows to load the proper RNDIS drivers, even though the device subclass is “incorrect”.
As suggested, this snippet from @dlech’s script sets up the OS Descriptors for our RNDIS device to be automatically installed:
echo 1       > ${g}/os_desc/use
echo 0xcd    > ${g}/os_desc/b_vendor_code
echo MSFT100 > ${g}/os_desc/qw_sign

mkdir ${g}/functions/rndis.usb0
echo RNDIS   > ${g}/functions/rndis.usb0/os_desc/interface.rndis/compatible_id
echo 5162001 > ${g}/functions/rndis.usb0/os_desc/interface.rndis/sub_compatible_id

ln -s ${g}/configs/c.1 ${g}/os_desc
If adding this still doesn’t work for you on Windows (like it happened to me), continue on to the Debugging section below.
Other Windows Supported Device Classes
If you want your gadget to be automatically installed by Windows without having to provide drivers, you can consult the USB device class drivers included in Windows.
Most of the popular types of devices are supported from Windows 7 onwards:
- Audio: class 0x1
- Human Interface Device (HID): class 0x3
- Mass Storage: class 0x8
Unfortunately, the CDC serial driver only works out-of-the-box from Windows 10 and above. According to Microsoft documentation,
In Windows 8.1 and earlier versions of the operating system, Usbser.sys is not automatically loaded when a USB-to-serial device is attached to a computer. To load the driver, you need to write an INF …
As we also found out, the RNDIS networking devices are supported if we can convince Windows to load the built-in RNDIS drivers. I’ve tested it to work on Windows 7, 8 and 10 without requiring any third-party drivers.
Debugging
Windows USB Stack
Being the guy who always strives for the minimal test case, I’ve tested the script with the bare minimum ConfigFS setup for a composite serial + network device, but the drivers were not correctly installed. I then added the OS Descriptors, but it still doesn’t work. This caused me a lot of hair pulling, and made me doubt whether this OS Descriptor nonsense even works at all.
It was not until I fully read the page on Microsoft OS Descriptors did I realise that Windows caches the presence of OS Descriptors the first time a device is plugged in (emphasis mine):
When a new device is attached to a computer for the first time, an operating system […] will request the string descriptor that is at index 0xEE. […] After the operating system requests a Microsoft OS String Descriptor from a device, it creates the following registry key..
The operating system creates a registry entry, named osvc, under this registry key that indicates whether the device supports Microsoft OS Descriptors. If the device does not provide a valid response the first time that the operating system queries it for a Microsoft OS String Descriptor, the operating system will make no further requests for that descriptor.
This has also been highlighted by the libwdi wiki on WCID devices:
When Windows checks for this String Descriptor, one of the first thing that happens is the creation of a registry entry, under
HKEY_LOCAL_MACHINE\SYSTEM\CurrentControlSet\Control\usbflags, that is the concatenation of VID+PID+BCD_RELEASE_NUMBER (This key is never deleted).
During testing on Windows, it is therefore necessary to remove the “UsbFlags” key for that particular device that indicates to the OS whether or not it supports Microsoft OS Descriptors. After deleting the key, the script that advertises the OS Descriptors should successfully convince Windows to use the RNDIS drivers automatically.
To ensure that your device will work on other Windows PCs, avoid using common or well-known vendor/product ID and instead, use your own VID/PID that has been uniquely assigned to you.
systemd Startup Script
If anything blows up in the gadget setup script, you will be able to see it in the logs as its output is captured by systemd.
Use journalctl to display the logs for a particular unit, in our case, the script that configures the USB gadget(s):
[root@alarmpi ~]# journalctl -u myusbgadget
-- Logs begin at Sun 2016-10-09 21:26:09 UTC, end at Mon 2016-10-10 00:19:20 UTC. --
Oct 09 21:26:28 alarmpi systemd[1]: Starting My USB gadget...
Oct 09 21:26:28 alarmpi myusbgadget[221]: /usr/bin/myusbgadget: line 33: mkfs.vfat: command not found
Oct 09 21:26:29 alarmpi myusbgadget[221]: /usr/bin/myusbgadget: line 78: echo: write error: No such device
Oct 09 21:26:29 alarmpi systemd[1]: myusbgadget.service: Main process exited, code=exited, status=1/FAILURE
Oct 09 21:26:29 alarmpi systemd[1]: Failed to start My USB gadget.
Oct 09 21:26:29 alarmpi systemd[1]: myusbgadget.service: Unit entered failed state.
Oct 09 21:26:29 alarmpi systemd[1]: myusbgadget.service: Failed with result 'exit-code'.
You can see from the log that the script failed due to the mkfs.vfat command and another echo that writes to a file in ConfigFS that failed. If the script fails and the ConfigFS doesn’t fully complete, Windows might say the device has malfunctioned.
Download
You can find the complete working files here on GitHub.
Further Reading
Here’s a list of other OS Descriptors if you are interested: https://msdn.microsoft.com/en-us/windows/hardware/gg463179.aspx
Linux docs on USB gadgets ConfigFS: https://www.kernel.org/doc/Documentation/ABI/testing/configfs-usb-gadget
Update 2017-01-17: Thanks to reader Geoff Hoff for pointing out that the OS descriptor code snippet was incomplete. I’ve also added a link to the complete files, just in case the post was hard to follow.

Hi Darell Tan,
I have some doubts, can you help me?
In this part:
“Create a systemd service unit for the USB gadget script and use systemctl enable myusbgadget to automatically start it on boot”
===================================================================
# /usr/lib/systemd/system/myusbgadget.service
[Unit]
Description=My USB gadget
After=systemd-modules-load.service
[Service]
Type=oneshot
RemainAfterExit=yes
ExecStart=/usr/bin/myusbgadget
[Install]
WantedBy=sysinit.target
==================================================================
Only needs to create and edit the file with:
$ sudo touch /usr/lib/systemd/system/myusbgadget.service
$ sudo nano /usr/lib/systemd/system/myusbgadget.service
Or need to do something else ? I don’t know and didn’t understand how to use systemctl enable.
Thanks,
Yes, after you create the service file, just run `sudo systemctl enable myusbgadget` to enable it.
Hi,
Very nice article. I struggled a lot too to make Windows recognize the PiZero as an Ethernet device without any user interaction, but finally managed to do it.
If that interests you, I uploaded the configuration files on a Github repository (https://github.com/wismna/HackPi).
Any know how to make windows recognise the gadgets and install the drivers. I’m having troubles here..
Best regards,
Daniel Tavares
Hi Darell,
To confirm my understanding, you can get Windows to automatically install RNDIS driver for a composite device of RNDIS + CDC-ACM (serial), even for the first time you plug the device, right?
If you plug in your composite device (RNDIS + Serial) to Windows PC the first time, do you still need to remove “UsbFlags” key from registry? Thanks.
Yes it will work for the first time without any additional steps required – plug & play. The UsbFlags only need to be removed if you have been doing previous USB device testing, and the device is not being recognized automatically.
It’s not a big deal although it “feels” ugly but the name of the serial device displays as Teensy USB in the device manager. I tried playing around with the files but I can’t get the USB to show as Raspberry Pi USB or Pi USB like it did when I used g_serial and the old method. do you have any idea on how to fix this if it’s possible to.
Hi Russell, the “product” string is what shows up as the device description in Windows. The line that controls this is here:
echo "Pi Zero Gadget" > strings/0x409/product.that’s what I expected it to be but doesn’t seem to be doing that on my two computers (one win7 and one win10). it seems to be taking the value from oem95.inf for some reason.
Ahh, if there is a driver or INF file that matches your device (VID/PID pair) then it’s quite likely Windows would use that instead. If you don’t want that to happen, you can pick a VID/PID combo that is unused. The ones I’ve used in my script above seems to work fine.
It could also be that you have installed the drivers for Teensy previously, which is why you are seeing that. A clean computer probably wouldn’t show that, which you can verify, if that is your concern.
this is how it shows in usbview and it all looks/works well except for the device name which is just a tad annoying
http://russelldavis.org/usbview.html
sorry but I would like to make sure of this point : does windows recognize the Linux HID gadget (g_hid) without driver ? for example if I set my board (Raspberry Pi Zero) as HID keyboard for a host machine with windows OS , does it work ?
Yes it should work. The types of USB devices supported by Windows natively are mentioned in the post. This post largely deals with composite gadgets and the RNDIS networking device in particular.
Thank you Darell, unfortunately it doesn’t work for my case this is why I am asking. its work perfectly on Linux Host machine but not windows, even the enumeration is not perfectly done. windows can not identify my gadget . dmesg tells that there is an error of endpoint.
[…] 接下来是网络共享的问题。之前我们提到过,这个默认的配置文件启用的是一个复合设备,然而我们在这里并没有看到其他的设备。看到这里,你应该猜到是什么问题了吧——没错,是Windows没有正确识别这个复合设备。根据这里的提示,我们需要手动编写一个脚本,让其手工配置USB Gadget的各项参数。这个脚本可以在这里找到,不过需要修改一下一开始的部分。首先是去掉modprobe的部分,这个驱动在内核中已经自动加载了。然后是手动挂载ConfigFS,使用mount none /config -t configfs 可以将configFS挂载到/config目录。这个脚本编辑完毕后,可以在/etc/init.d/里面放一个起动脚本,让其开机自动启动。 […]
Hello,
Is it possible to simulate touchscreen with the above method ? Where do we specify the endpoints
(or maybe it’s not possible with the above method) ?
Thanks,
ranran
I’m not so sure about a touchscreen, but the closest might be a HID gadget like a USB keyboard or a mouse? That is doable with current Linux drivers.
Thanks for the tutorial!
Please explicitly mention that rndis has to be the first enabled function to work in Windows.
I intuitively sorted the lines so acm was before rndis and it stopped working in Windows (still worked fine in Linux).
So if the line:
ln -s functions/rndis.usb0 configs/c.1/
is preceded by a similar one (e.g. for the acm.usb0), Windows 10 will report error:
This device cannot start. (Code 10)
Also, where did you find the proper value for MaxPower?
MaxPower tells the USB host the maximum current this device will draw. Just helps the host make better decisions for power management, supposedly.
[…] http://www.raspibo.org/wiki/index.php/Chip:_USB_hid_on_libcomposite Raspberry Pi Zero as Multiple USB Gadgets […]
[…] (really good presentation on Kernel UDC interface and configfs)https://irq5.io/2016/12/22/raspberry-pi-zero-as-multiple-usb-gadgets/ (setting up multiple gadgets on one USB […]