I have been running a software RAID array at home for some time now. It’s a single network storage where I consolidate all my files. I manage this array manually using the mdadm command. Some people choose to buy a NAS storage box which hides all of the implementation details behind a nice Web GUI, but it’s essentially the same thing under the hood.
It operates with 4 drives using Linux software RAID 5, which means it can tolerate a single drive failure, but failures don’t always take out an entire drive. They usually manifest as bad sectors in a drive. As an illustration, the RAID 5 array below can still operate properly (meaning no data loss, yet) with bad sectors on two of its drives:
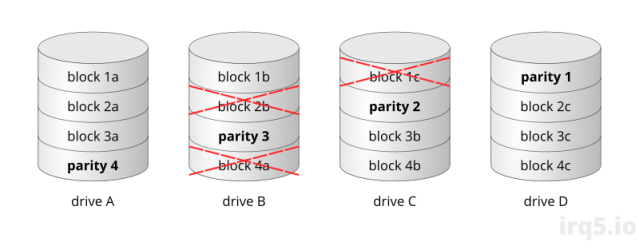
As long as the other drives in the array doesn’t develop bad sectors in the same stripe, the data can still be reconstructed from the remaining good blocks. This means that you can somewhat leave the drive as it is for a period without replacement, but of course you are taking a risk.
I thought I’d share my experiences with drive replacements thus far.
Detecting Drive Problems
Most Linux distributions provide the raid-check script for periodic RAID scrubbing. This is basically a background cron job that tells the kernel to start checking the RAID array. For RHEL/CentOS systems, this should occur every weekend.
During this scrubbing process, all drives within the array are read and their parity blocks are computed, to ensure that everything tallies.
It is during this verification process that sometimes causes hard drive errors to show up. Typically when a drive encounters a problem during read, the hardware returns an error, which will then be logged by Linux. They can look like these:
ata3.00: exception Emask 0x0 SAct 0x0 SErr 0x0 action 0x0
ata3.00: irq_stat 0x40000001
ata3.00: failed command: READ DMA EXT
ata3.00: cmd 25/00:00:d8:10:27/00:02:05:00:00/e0 tag 8 dma 262144 in
         res 51/40:1f:b8:12:27/00:00:05:00:00/e0 Emask 0x9 (media error)
ata3.00: status: { DRDY ERR }
ata3.00: error: { UNC }
ata3.00: configured for UDMA/133
ata3: EH complete
 .
 . (repeats)
 .
sd 2:0:0:0: [sdc]  Result: hostbyte=DID_OK driverbyte=DRIVER_SENSE
sd 2:0:0:0: [sdc]  Sense Key : Medium Error [current] [descriptor]
Descriptor sense data with sense descriptors (in hex):
        72 03 11 04 00 00 00 0c 00 0a 80 00 00 00 00 00
        05 27 12 b8
sd 2:0:0:0: [sdc]  Add. Sense: Unrecovered read error - auto reallocate failed
sd 2:0:0:0: [sdc] CDB: Read(10): 28 00 05 27 10 d8 00 02 00 00
end_request: I/O error, dev sdc, sector 86446776
And if you look through your previous logs and find a whole bunch of I/O errors, you should probably go out and get a replacement drive.
# grep "I/O err" /var/log/messages
 .. kernel: end_request: I/O error, dev sdc, sector 86445744
 .. kernel: end_request: I/O error, dev sdc, sector 86446248
 .. kernel: end_request: I/O error, dev sdc, sector 86446776
 .. kernel: end_request: I/O error, dev sdc, sector 86446856
 .. kernel: end_request: I/O error, dev sdc, sector 86446872
You can grep for certain keywords to get a summary of errors, or you can also inspect the errors file for each device in the /sys/block/mdX/md directory to get their error count. A simple way to do this is to use the head command, like so:
# head /sys/block/md0/md/dev-*/errors

==> /sys/block/md0/md/dev-sda/errors <==
8

==> /sys/block/md0/md/dev-sdb/errors <==
0

==> /sys/block/md0/md/dev-sdc/errors <==
4888

==> /sys/block/md0/md/dev-sdd/errors <==
176
From the error counts, you can tell that sdc badly needs replacement with its high number of errors and following that, sdd as well. These numbers are not reset automatically, but they can be reset manually by writing a value into the respective file.
Verifying the Errors
Sometimes, these drive read errors are transient. They may be corrected if you re-write that particular sector(s). This is what the kernel does automatically when it encounters failed reads. It reconstructs the data from the other working drives in the array, so you should see these messages also show up in the syslog:
kernel: md/raid:md0: read error corrected (8 sectors at 86445744 on sdc)
kernel: md/raid:md0: read error corrected (8 sectors at 86446248 on sdc)
kernel: md/raid:md0: read error corrected (8 sectors at 86446776 on sdc)
kernel: md/raid:md0: read error corrected (8 sectors at 86446856 on sdc)
kernel: md/raid:md0: read error corrected (8 sectors at 86446872 on sdc)
However, a successful write to problem sectors does not mean the problem is fixed. Sometimes the rewritten sector holds for a bit, then starts to fail again after some time. At other times, the data just doesn’t stick at all.
To verify whether the errors are still present, you can use hdparam to read that particular sector, or sectors in the vicinity:
# hdparm --read-sector 86446224 /dev/sdc

/dev/sdc:
reading sector 86446224: FAILED: Input/output error
You can also check the drive’s SMART log to verify that the errors were indeed logged by the drive. Notice that hdparm directly issues a “READ SECTOR” command (0x20) to the drive, which is the command that resulted in the read error and logged below:
# smartctl -l error /dev/sdc
...
SMART Error Log Version: 1
ATA Error Count: 240 (device log contains only the most recent five errors)
.
.
Error 240 occurred at disk power-on lifetime: 28538 hours (1189 days + 2 hours)
  When the command that caused the error occurred, the device was active or idle.

  After command completion occurred, registers were:
  ER ST SC SN CL CH DH
  -- -- -- -- -- -- --
  40 51 01 b8 12 27 e5  Error: UNC at LBA = 0x052712b8 = 86446776

  Commands leading to the command that caused the error were:
  CR FR SC SN CL CH DH DC   Powered_Up_Time  Command/Feature_Name
  -- -- -- -- -- -- -- --  ----------------  --------------------
  20 00 01 b8 12 27 e5 08   8d+21:12:22.173  READ SECTOR(S)
  ca 00 08 10 00 00 e0 08   8d+21:12:22.034  WRITE DMA
OK, so now that you have verified that you do indeed have a drive with bad sectors, we can move on to swapping it out for a good one.
Replacing the Drive
Replacement is relatively easy. You should ensure that the replacement drive has been burned in, or at least tested, just to make sure you don’t replace a faulty drive with yet another faulty one. I follow this guide on the FreeNAS forum which essentially just runs some hardware tests using smartctl, then badblocks to read/write every sector once. Depending on your hardware, this process may take up to 2-3 days.
You need to insert the drive physically, then add it into the array. Sometimes this requires a reboot, unless you have hotplug enabled on your SATA ports. I have 4 drives in my system (sda to sdd), so the new replacement drive gets assigned sde. You can add it into the array like so:
# mdadm /dev/md0 --add /dev/sde

# mdadm --detail /dev/md0

/dev/md0:
        Version : 1.2
     Raid Level : raid5
   .
   .
          State : clean
 Active Devices : 4
Working Devices : 5
 Failed Devices : 0
  Spare Devices : 1
   .
   .
   .
    Number   Major   Minor   RaidDevice State
       6       8        0        0      active sync   /dev/sda
       1       8       16        1      active sync   /dev/sdb
       2       8       32        2      active sync   /dev/sdc
       4       8       48        3      active sync   /dev/sdd

       5       8       64        -      spare   /dev/sde
Now the drive appears as a “spare” in the array. You need to instruct the kernel that the spare drive sde will be replacing an existing drive sdc:
# mdadm /dev/md0 --replace /dev/sdc --with /dev/sde
It should then be on its way. This method of drive replacement is called hot-replace, and it should be the preferred method. While browsing other similar articles you may encounter older methods like failing the drive first, then removing it from the array, before adding the new drive. Don’t do that.
You can occasionally check on its progress by viewing the /proc/mdstat file.
# cat /proc/mdstat
Personalities : [raid6] [raid5] [raid4]
md0 : active raid5 sde[5](R) sda[6] sdd[4] sdb[1] sdc[2]
      8790405888 blocks super 1.2 level 5, 256k chunk, algorithm 2 [4/4] [UUUU]
      [===============>.....]  recovery = 77.5% (2273028148/2930135296) finish=129.2min speed=84746K/sec
      bitmap: 3/22 pages [12KB], 65536KB chunk
Hot Replacement Feature
This hot-replace feature was introduced into the kernel at version 3.2. Although you supposedly need a 3.2 kernel, RHEL/CentOS 6 backported this feature and even ships with mdadm >=3.3 to make it all work seamlessly.
Unlike other older methods of failing the drive and removing it from the array, this hot-replacement method offers better assurance that your data will still be intact.
Using the older method, your 4 drive array will degrade with only 3 functioning drives. During the rebuild process, failure in any one more drive will therefore result in loss of data. When that happens, it is also not possible to add the failed drive back into the array because from the time that it was removed, new data may have been written to the RAID volume, causing the removed drive to be out-of-sync with the rest.
However, in the case of hot-replacement you still have all 4 drives and a non-degraded array. The kernel tries to make a copy from the failing device, and only when certain sector read fails does the other drives get used for reconstruction.
You can verify this behaviour by running iostat during a hot-replacement:
# iostat -m -d 2
Device:        tps   MB_read/s   MB_wrtn/s   MB_read   MB_wrtn
sda           2.00        0.00        0.00         0         0
sdb           1.50        0.00        0.00         0         0
sdd           1.50        0.00        0.00         0         0
sdc         203.00      100.32        0.00       200         0
sde         206.00        0.00      100.32         0       200
You can see that the bulk of data reads & writes are made from sdc to sde, indicating that the kernel is making a drive-to-drive copy, leaving the other drives in the array undisturbed.
And while all of this is happening, you can still use the RAID volume as per normal, albeit at a diminished speed.
Conclusion
Hopefully this article would be of some help, especially if this is the first time you have encountered drive errors in your RAID array.
Using these available tools, you can inspect and assess for yourself whether your RAID drive needs replacement, and if so, how you should handle it.
You might also be interested in checking out the smartmontools BadBlockHowto.
